Omni Automation Controls in OmniFocus
The Omni Automation support in OmniFocus provides interfaces for managing and interacting with scripts and installed plug-ins.
Plug-In Management
Regardless of which Apple device you’re currently using to interact with your OmniFocus database, there is a comprehensive set of controls for managing all of the Omni Automation plug-ins for OmniFocus you have chosen to install.
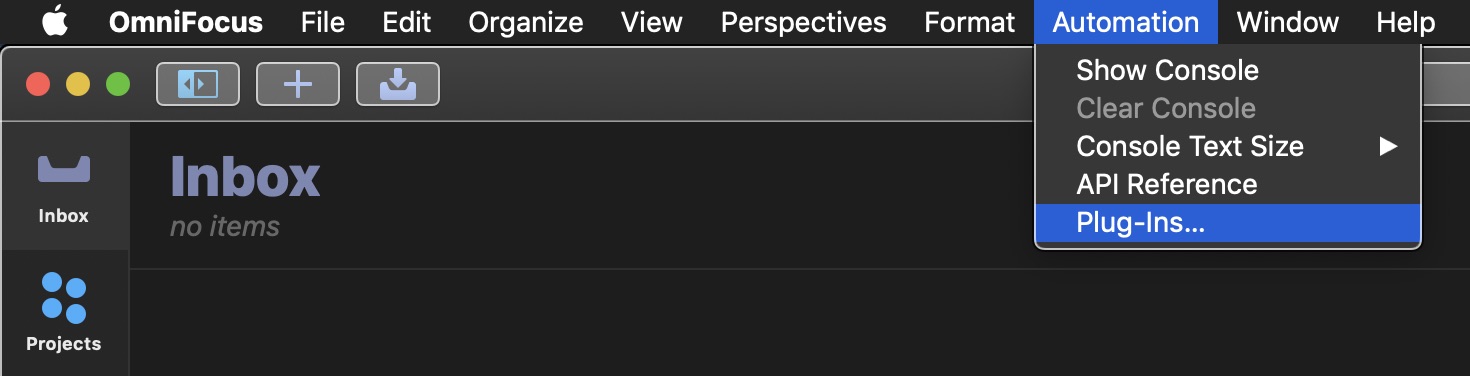
On macOS, the interface for plug-in management is summoned via the “Plug-Ins…” option in the Automation menu:
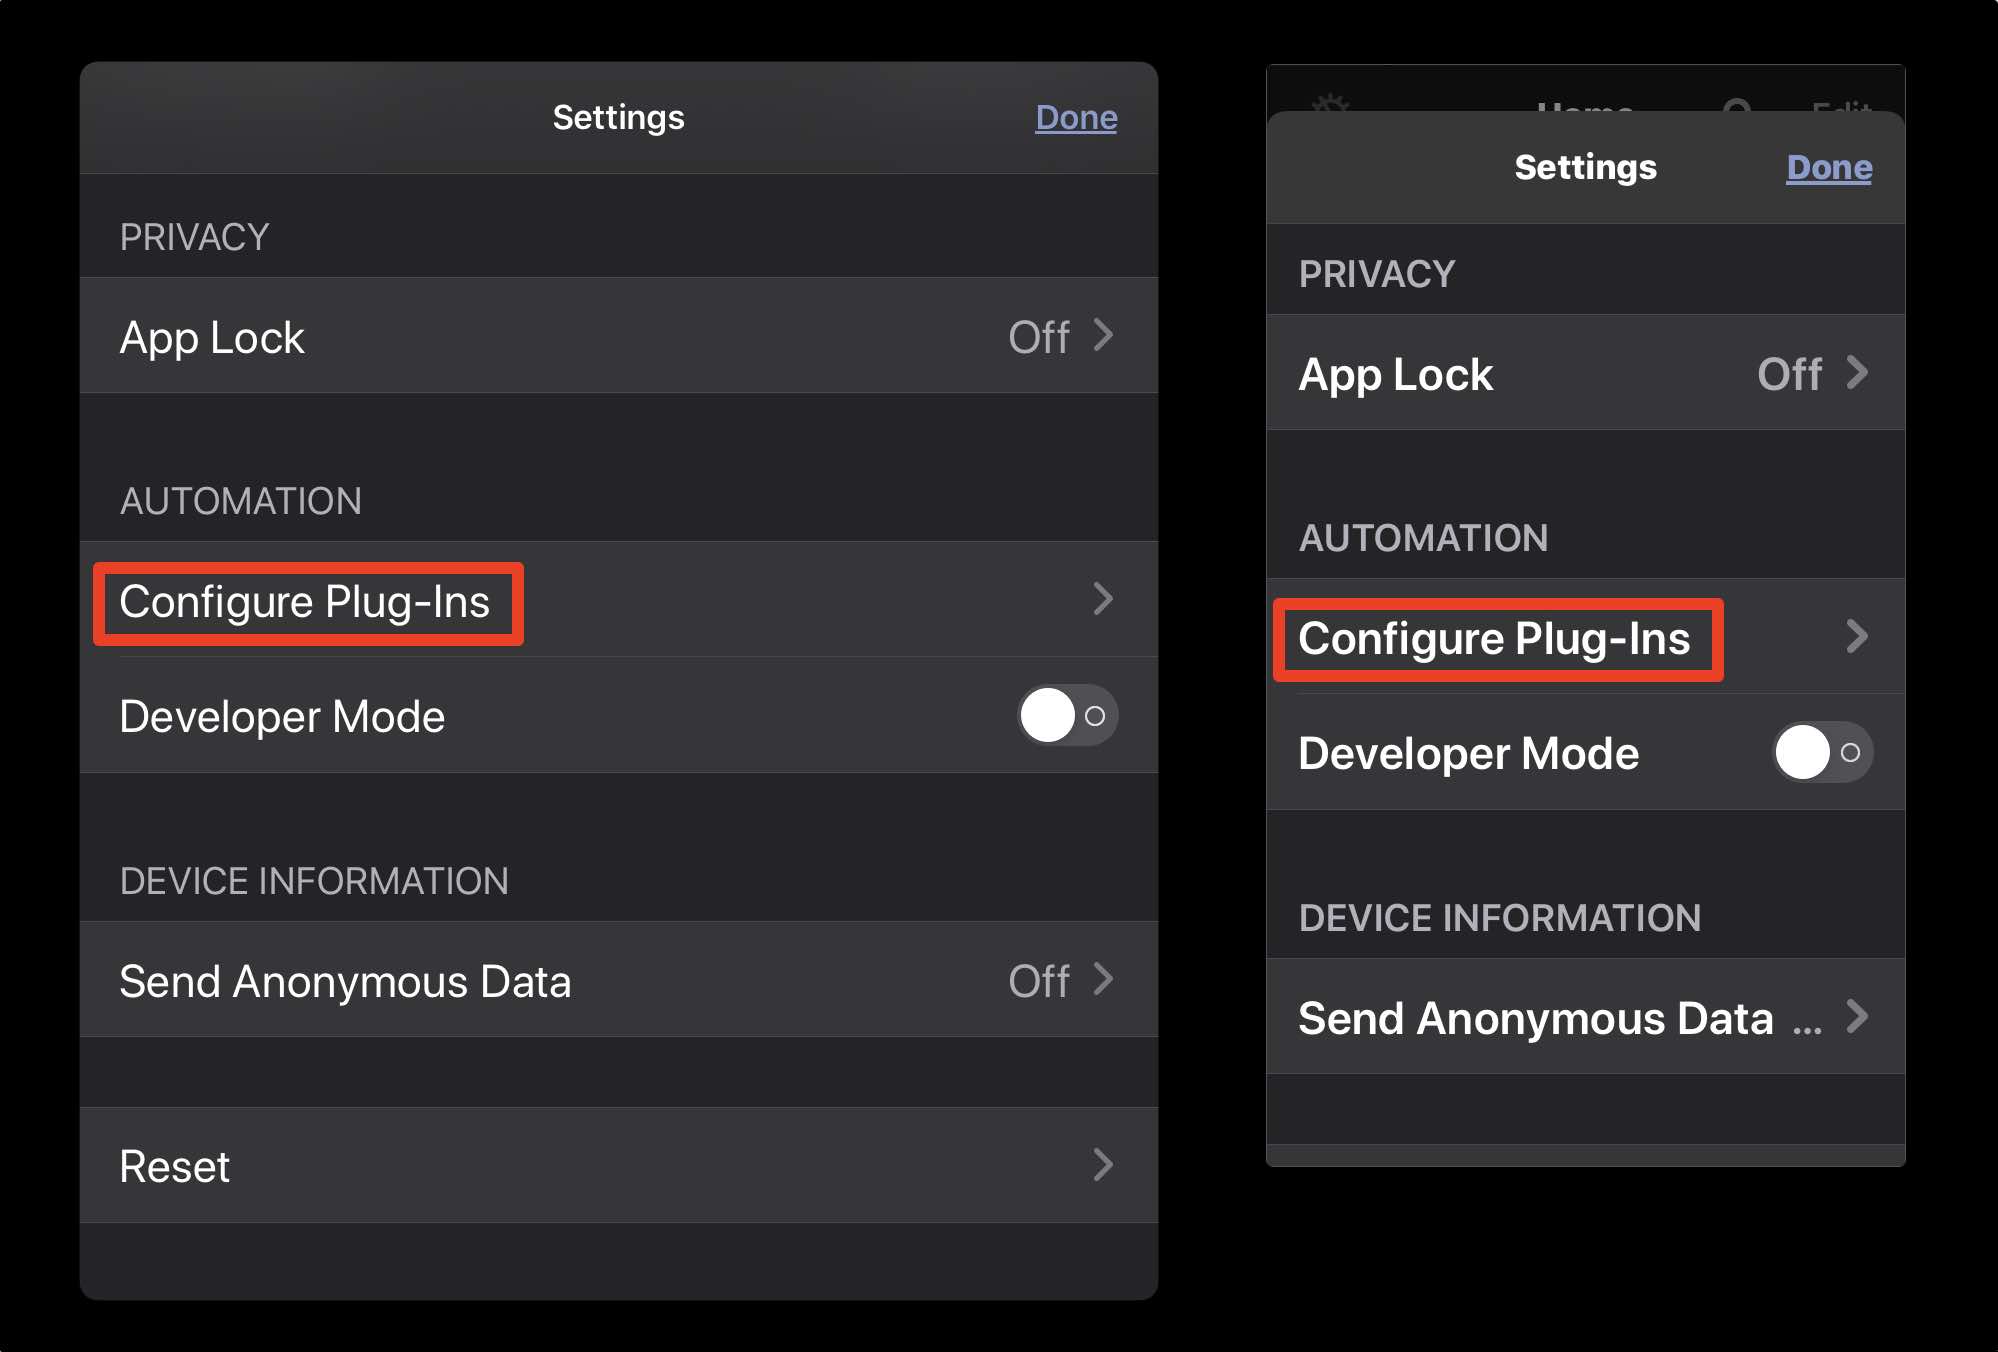
On iPadOS (below left) and iOS (below right), access to the plug-in management dialog is provided via the “Configure Plug-Ins” option in the application preferences dialog:
In macOS the plug-in management controls are displayed in a dialog:
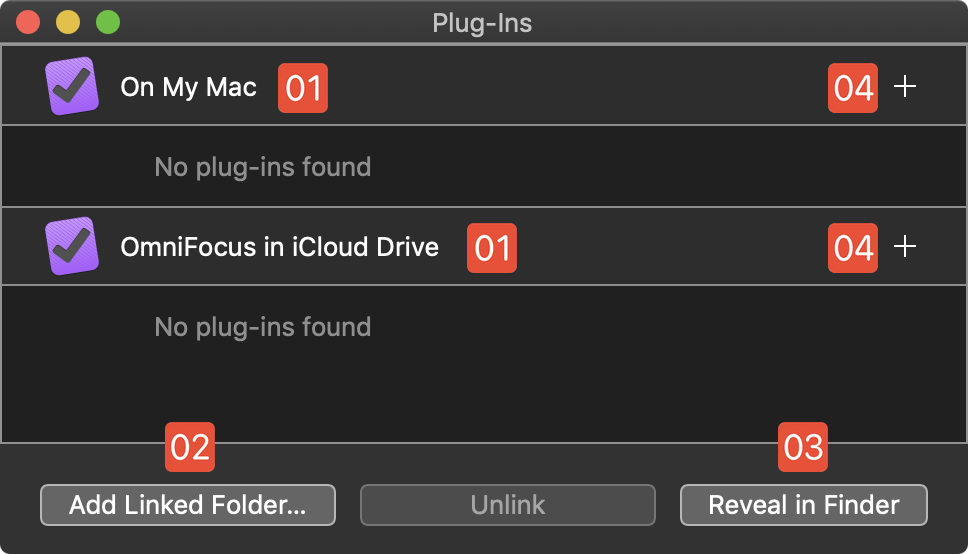
1 Plug-In Storage Folders • By default, On My Mac is linked to a built-in plug-ins folder within the application resources. Plug-Ins added to this directory will only be available to the current user. If iCloud Drive is active, a second storage folder is created within the OmniFocus folder on the iCloud volume. Plug-Ins placed within this directory will be available on other Apple devices sharing the iCloud account. 2 Add Linked Folder • Click this button to add a custom directory in which to store OmniFocus plug-ins. Linked folders can be created locally or on shared network volumes such as DropBox. 3 Reveal in Finder • Clicking this button will reveal the selected directory or plug-in in the Finder desktop. TIP: double-click a linked folder’s title to show it in the Finder. 4 New Plug-In • For those wishing to make their own plug-ins, clicking the plus icon (+) across from the linked folder title will create and open a new plug-in template in your chosen text editor application. |
On iPadOS (below left) and iOS (below right), the plug-in configuration dialog contains controls for managing installed OmniFocus plug-ins:
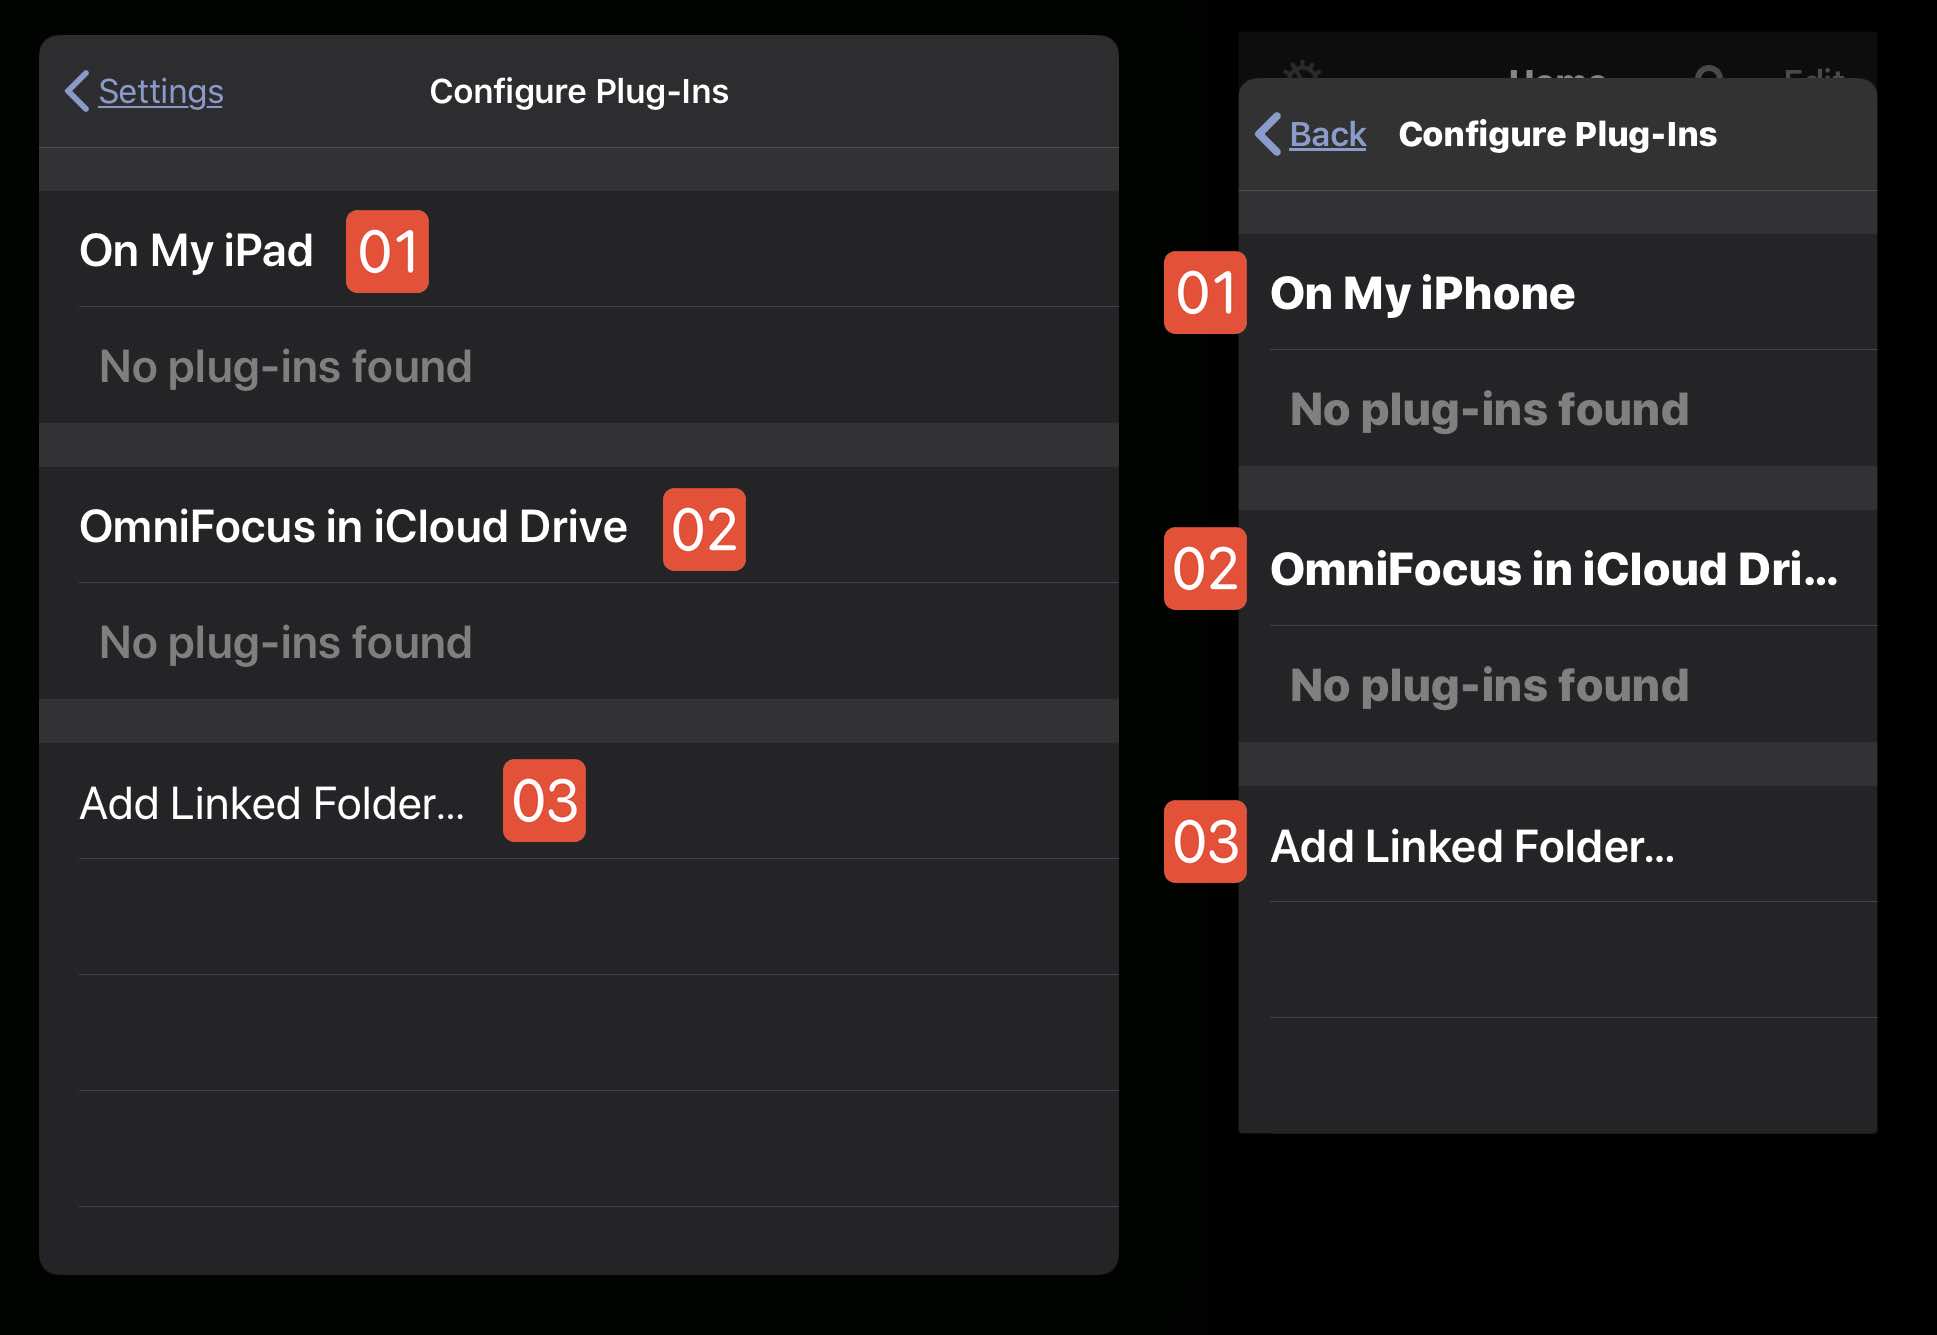
1 Plug-In Folder on Device • By default, the On My iPad and On My iPhone buttons are linked to a built-in plug-ins folder within the application resources. Plug-Ins added to this directory will only be available on the hosting device. 1 Plug-In Folder in iCloud • If iCloud Drive is active on the device, a second storage folder is created within the OmniFocus folder on the iCloud volume. Plug-Ins placed within this directory will be available on other Apple devices sharing the iCloud account. 2 Add Linked Folder • Click this button to add a custom directory in which to store OmniFocus plug-ins. Linked folders can be created locally or on shared network volumes such as DropBox. |
Automation Menu & Console
On macOS (Mac), the OmniFocus Automation menu is active by default. This menu displays installed plug-ins as well as options for accessing the console window in which you can write and run Omni Automation scripts.
NOTE: plug-in actions displayed in the Automation menu (on macOS, iOS, and iPadOS) may be contextual by design, in that they will be enabled only when items selected in the application interface meet a set of pre-defined criteria placed in the plug-in code, such as only a single task is selected, or a specific perspective is currently visible.
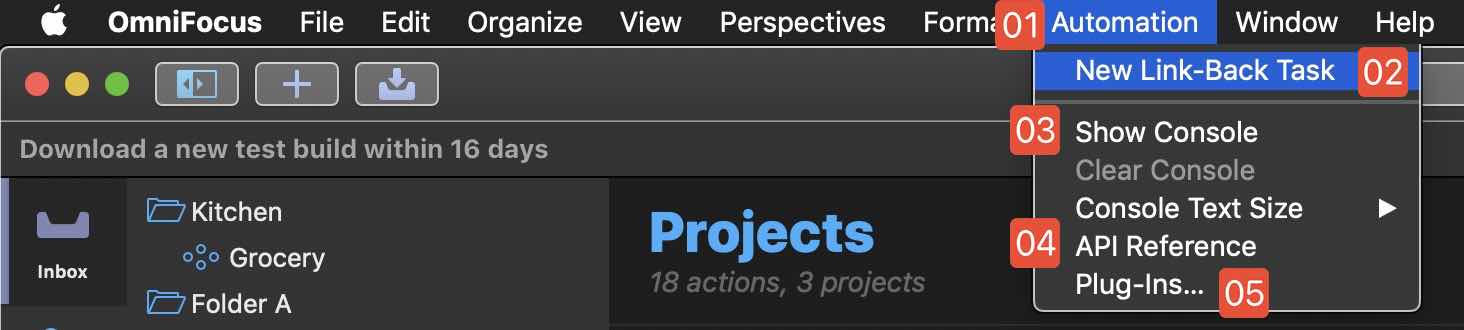
1 Automation Menu • This menu displays titles of the installed plug-ins as well as options for accessing built-in automation management and editing features. 2 Installed Action • A selected plug-in action. In this example, the action is contextual, operating on the currently selected task. 3 Show Console • Selecting this option will display the Console window, in which you can enter and run Omni Automation scripts executing within the OmniFocus application. 4 API Reference • Select this option to switch the display of the Console window to a scrolling filterable list of all of the classes, functions, and properties supported in OmniFocus. 5 Plug-Ins… • Select this option to summon the plug-in management window. |
On iPadOS (below left) and iOS (below right), access to the Automation menu and script Console is enabled by activating the “Developer Mode” option in the application preferences dialog:
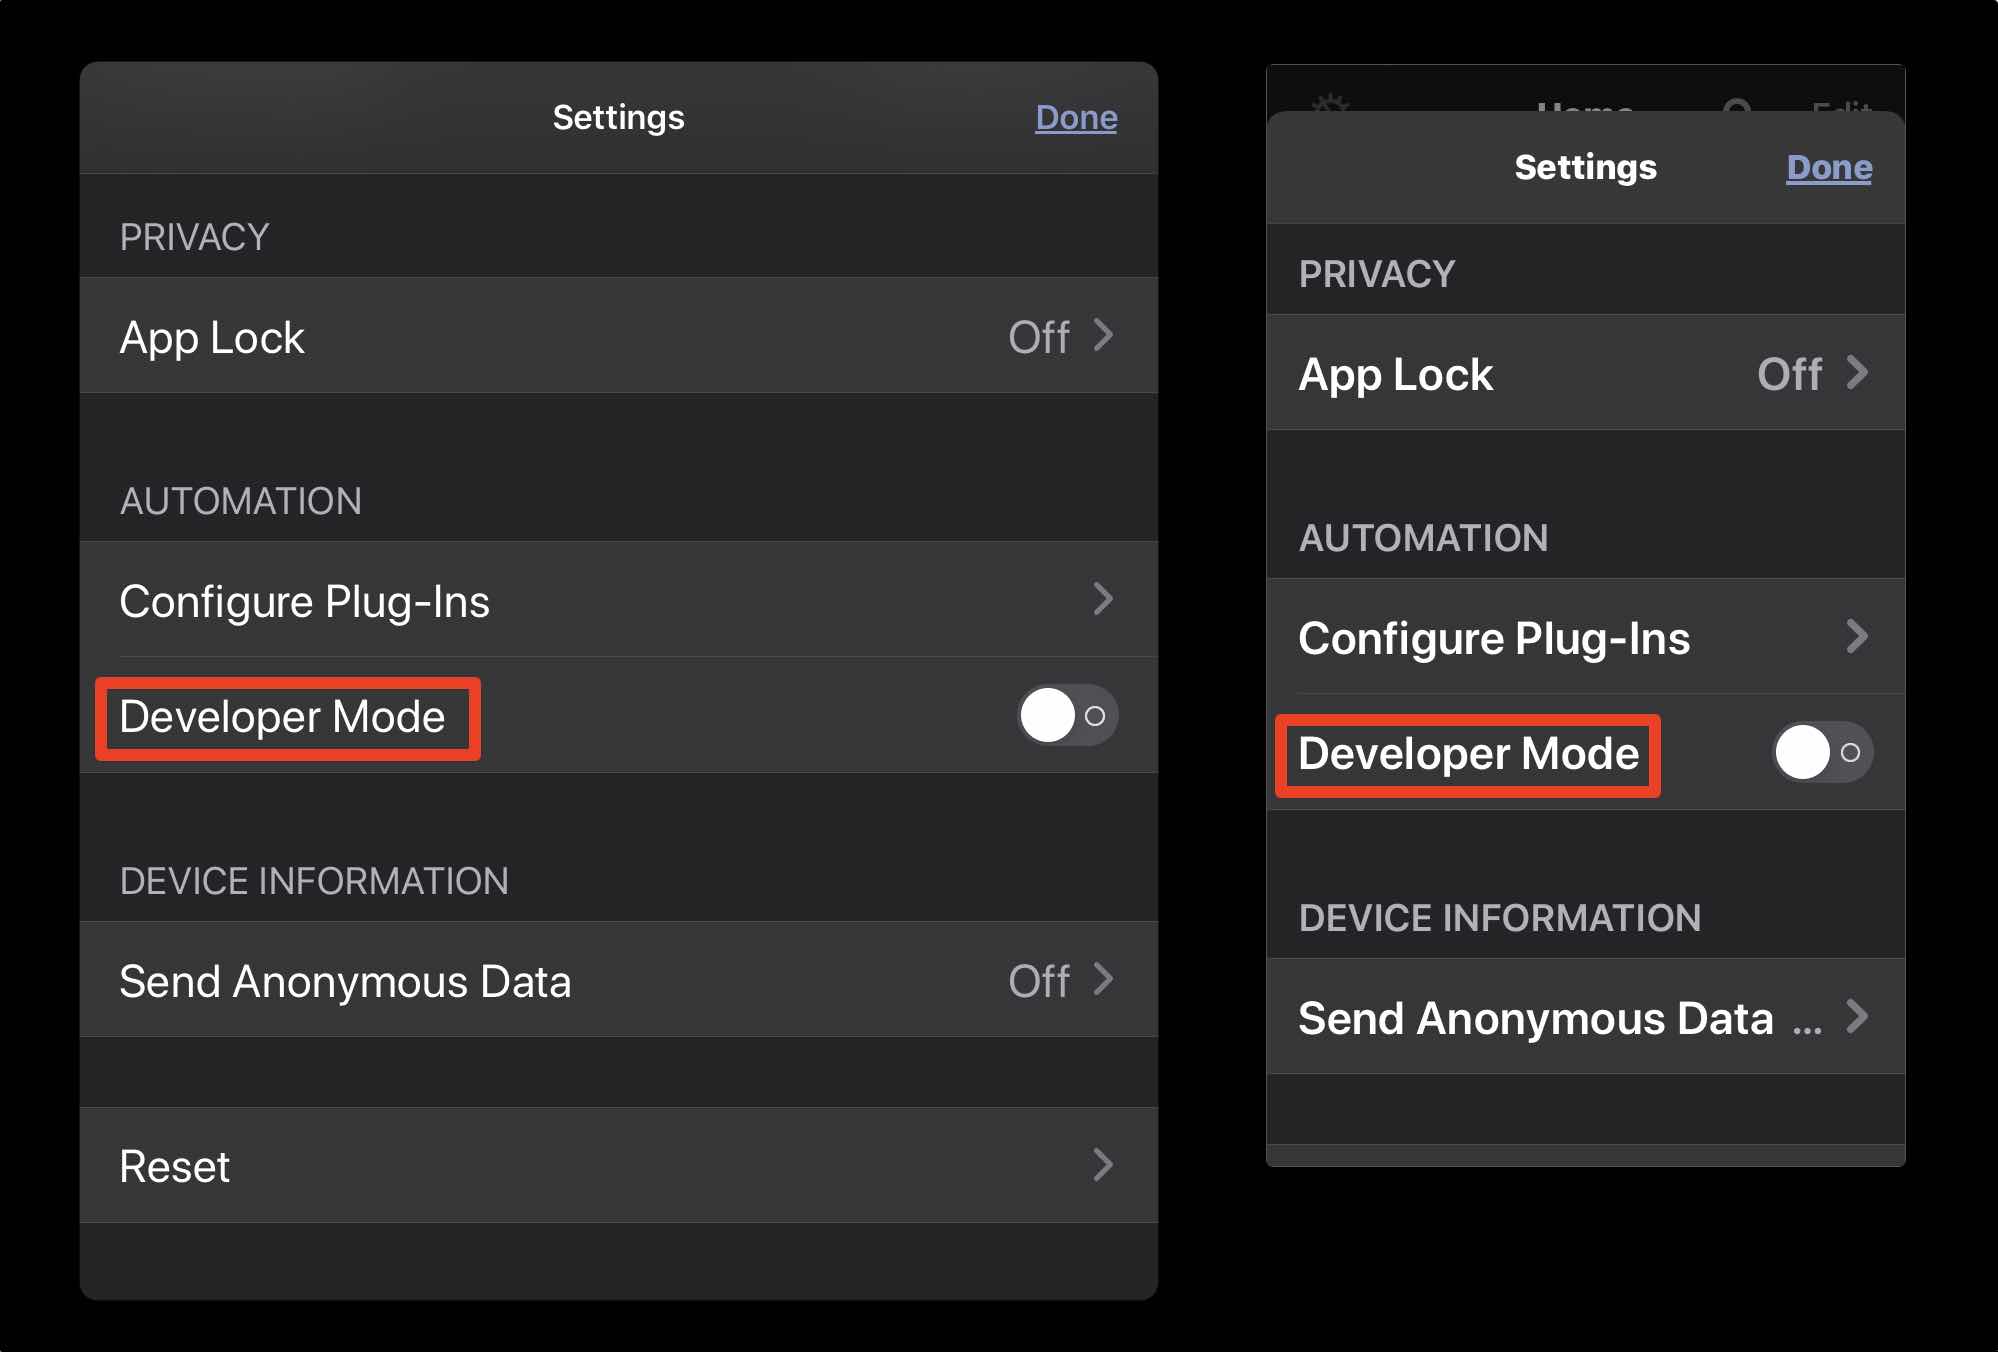
Once activated, Developer Mode provides access to the Automation Menu and the Console window.
On iPadOS (iPad):
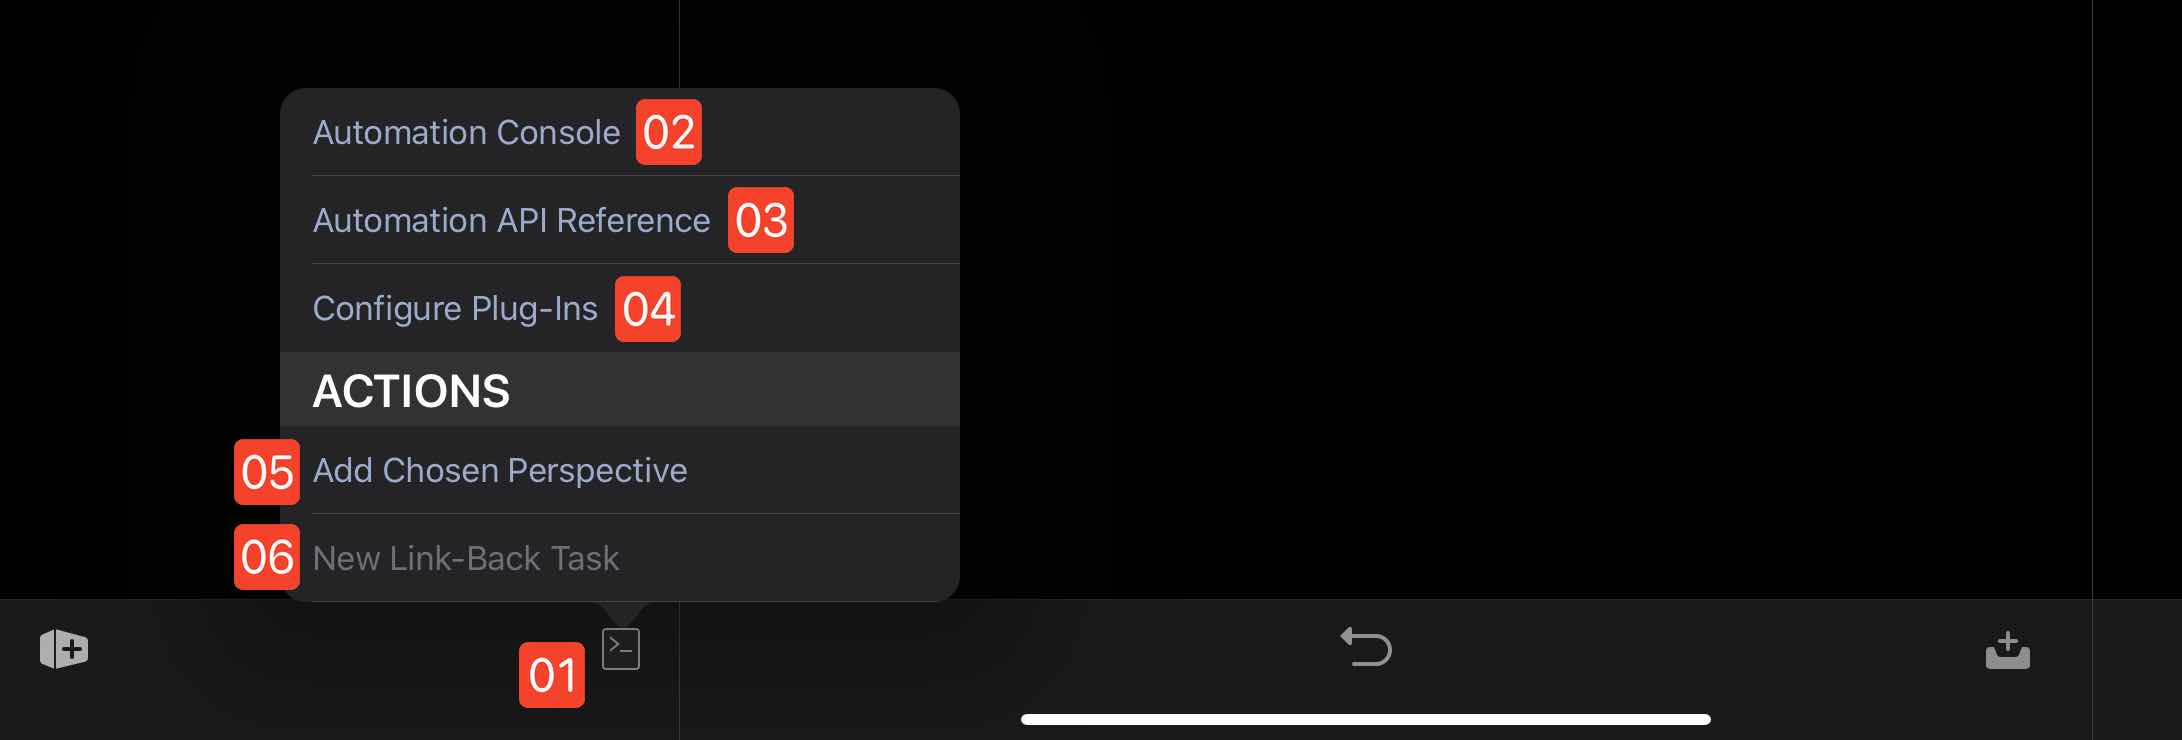
1 Automation Menu • In OmniFocus on iPadOS, the Automation Menu icon is located at the bottom left of the app view. 2 Automation Console • Open the Automation Console sheet in which you can write and run Omni Automation scripts run within the OmniFocus application. 3 Automation API Reference • Display the built-in API documentation in an overlay sheet. 4 Configure Plug-Ins • Summons the plug-in management dialog. 5 Active Plug-In • A plug-in ready to be run. 6 Disabled Plug-In • A plug-in whose contextual input requirements are not met using the current selection in the application. |
On iOS (iPhone):

1 Automation Menu Icon • On iOS the Automation menu icon in OmniFocus is placed at the lower right of the window.
2 Automation Menu Sheet • The Automation menu is displayed as a sheet overlay. This menu displays controls for accessing installed plug-in actions and built-in automation tools and documentation.
3 Automation Console • Select this option to close the menu sheet and open the Console sheet. In the Console, you can write and run Omni Automation scripts within the OmniFocus application.
4 Automation API • Select this option to switch the view in the Console to a scrolling filterable list of all of the classes, functions, and properties supported in OmniFocus scripting.
5 Configure Plug-Ins • Select this option to summon the plug-in management view.
6 Active Action • An active plug-in action that is ready to be executed.
7 Disabled Actions • Disabled plug-in actions whose contextual requirements have not been met.