Plug-In Forms (also called “Action Forms”)
Omni Automation enables the creation of powerful automation tools for addressing the tasks and challenges involved in the creative use of productivity applications like Omni Productivity Suite.
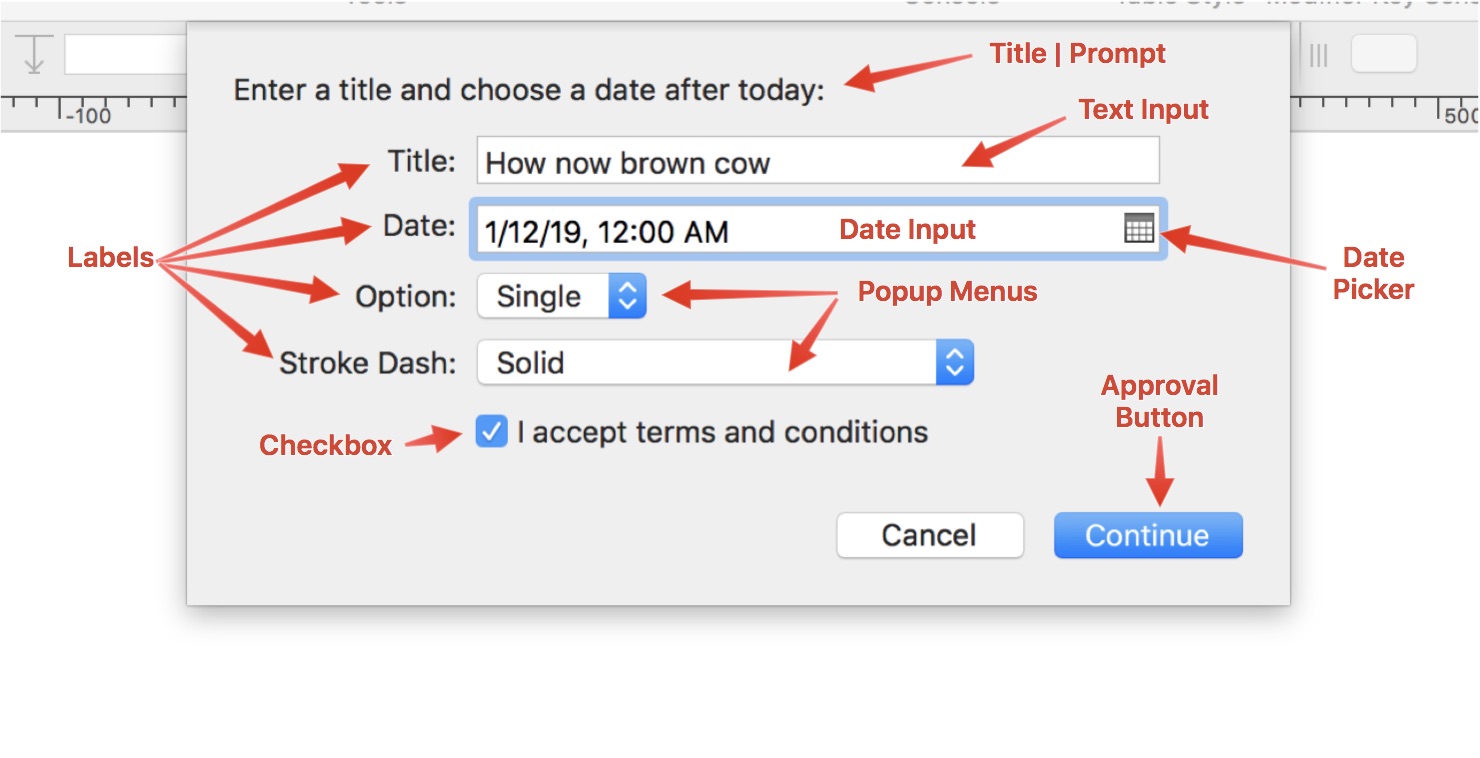
Plug-In Forms (also referred to as Action Forms) enable plug-ins to display standard form selection and input elements, such as text fields, menus, and checkboxes (switches on iOS), so the user may provide the plug-in with the choices and data to be used by the plug-in during the execution of its processing code.
In addition, Form Elements may include optional labels and be assigned default values and ordering, so as to create Form Dialogs that present data and choices in an easy-to-understand and organized manner. And Form Dialogs can be enhanced with customized prompts and approval button titles.
(⬇ see below ) A macOS form dialog sheet
The following documentation details the use of the Form and Form.Field classes, along with their corresponding functions and methods, demonstrating how to create, display, and respond to forms included in your plug-ins.
This overview will begin with an examination of the Form class and how to create a new form object in a script.
The Form Class
The Form class provides a mechanism to collect input from the user. Each form contains one or more instances of the Form.Field subclasses (form elements), to which each are assigned a unique key. As the form is filled out by the user, the form’s default values object is populated with the values of the form elements in the form dialog.
Instances of the Form class are created using the standard JavaScript new object constructor:
Form Instance
var inputForm = new Form()
The result is an empty instance of the Form class, ready to contain various elements of the Form.Field class, such as text input fields, date pickers, checkboxes, and popup menus.
Instance Properties
fields (Array of Form.Field r/o) • The current Field instances in the form, which will be visible to the user entering input.
validate (Function or null) • A function to check whether the entered values are acceptable. The form to validate is passed as the argument and the function is expected to return a boolean result or null to perform default validation. If an Error is thrown, it’s message will be displayed in the form as the reason for validation failure. Note that the validation function may add or remove fields and update entries in the values object (which will cause the interface to be updated). This is called any time the user edits values, or a field is added or removed. If no validate function is specified or it returns null, some per-field default validation will be performed (see Form.Field.Option. If the validate function returns a boolean result, no default validation will be performed.
values (Object r/o) • An object with the collected values for each field, stored under the key for that field.
Instance Functions
addField(field: Form.Field, index: Number or null) → ( ) • Adds the new Field to the Form, at the indicated position, or at the end if no position is specified. If the field has a default value, it will be added to the values result object immediately.
removeField(field: Form.Field) → ( ) • Removes the Field from theForm. Any entry in the values for this field will be removed as well.
show(title: String, confirmTitle: String) → (Promise of Form) • Present the Form to the user, and return a Promise to be fullfilled or rejected when the user commits or cancels the form.
Form Elements
An instance of the Form class is a container that contains various form elements, such as popup menus, checkboxes, and date and text input fields. All of the form elements are instances of the Form.Field class, and they share the following properties:
displayName (String r/o) • Human readable string used as the label for this field. If a value is not provided for this property, no label is displayed for the corresponding form element.
key (String r/o) • The key to use when storing and retrieving the value for this field in the containing form’s values object. The key for each element should be unique.
Instances of the Form.Field class are created using the standard JavaScript new object constructor including the parameters specific to each type of element:
new Form.Field.Checkbox(key:String, displayName:String or null, value:Boolean or null) • Returns a new Checkbox field, optionally with an initial value (which will be false if no value is specified).
new Form.Field.Date(key:String, displayName:String or null, value:Date or null) • Returns a new Date field, optionally with an initial value. The user’s date formatting preference will be used to display and determine component ordering when parsing dates. Relative dates like “1d”, “tomorrow”, “now” can also be entered.
new Form.Field.Option(key:String, displayName:String or null, options:Array of Object, names:Array of String or null, selected:Object or null) • Returns a new Option field (menu), allowing the user to pick from a list of option objects. A list of names may also be given, which must have the same length as the options array if so. If no names are given, the objects are converted to strings for display. An initially selected object (which must be a member of the options array) may also be given.
new Form.Field.MultipleOptions(key: String, displayName: String or null, options: Array of Object, names: Array of String or null, selected: Array of Object) • Returns a new MultipleOptions field, allowing the user to pick multiple items from a list of option objects. A list of names may also be given, which must have the same length as the options array if so. If no names are given, the objects are converted to strings for display. An array of zero or more initially selected objects (which must be members of the options array) may also be given. An empty array is valid input for the initially selected items. Additionally, it is valid for MultipleOptions fields to have a value that is an empty array.
new Form.Field.String(key:String, displayName:String or null, value:String or null) • Returns a new String field (text input), optionally with an initial value.
For example, here is script code that creates each of the various types of form elements:
Form Elements
// TEXT INPUT FIELDtextInput = new Form.Field.String("textInput","Name",null)// DATE INPUT FIELDdateInput = new Form.Field.Date("dateInput","Date",null)// OPTIONS MENUoptionsMenu = new Form.Field.Option("optionsMenu","Position",[1,2,3],["Top", "Middle", "Bottom"],1)// SOLITARY CHECKBOX|SWITCHsolitaryCheckbox = new Form.Field.Checkbox("checkboxSwitch","Append to selected paragraph",false)// MULTIPLE OPTIONSmultiOptionMenu = new Form.Field.MultipleOptions("multipleOptions","Multiple Options",[0,1,3],["One","Two","Three"],[])
Adding Elements to a Form
Created Form Elements are added to an existing Form instance using the addField(…) instance function of the Form class.
addField(field: Form.Field, index: Number or null) → ( ) • Adds the new Field to the Form, at the indicated position, or at the end if no position is specified. If the field has a default value, it will be added to the values result object immediately.
For example, here is how the previously created form elements would be added to the previously created form:
Add Elements to Form
inputForm = new Form()inputForm.addField(textInput)inputForm.addField(dateInput)inputForm.addField(optionsMenu)inputForm.addField(solitaryCheckbox)inputForm.addField(multiOptionMenu)
NOTE: if a position index is not included as a parameter in the addField(…) function, the created element is added to the end of the set of current form elements. Also, if the position index parameter is not used, then form elements are added to the current set of form elements in the order in which the function is called to add them. The topmost position index is 0.
Displaying the Form
Once a form has been populated with elements, it is displayed within the application by using the show(…) instance function of the Form class:
show(title: String, confirmTitle: String) → (Promise of Form) • Present the Form to the user, and return a Promise to be fullfilled or rejected when the user commits or cancels the form.
The show(…) function takes two text string for its parameters: the dialog title/prompt, and optionally, the title of the approval button.
NOTE: The JavaScript Promise object represents the eventual completion (or failure) of an asynchronous operation, and its resulting value. It is discussed in more detail in the next section about validating, retrieving, and using the form data.
Here is an example script that will display a form containing each of the form element types:
NOTE: This page contains interactive script examples that are executed only with your approval. See the section on Script Security for details about allowing the execution of remote scripts.Example Form
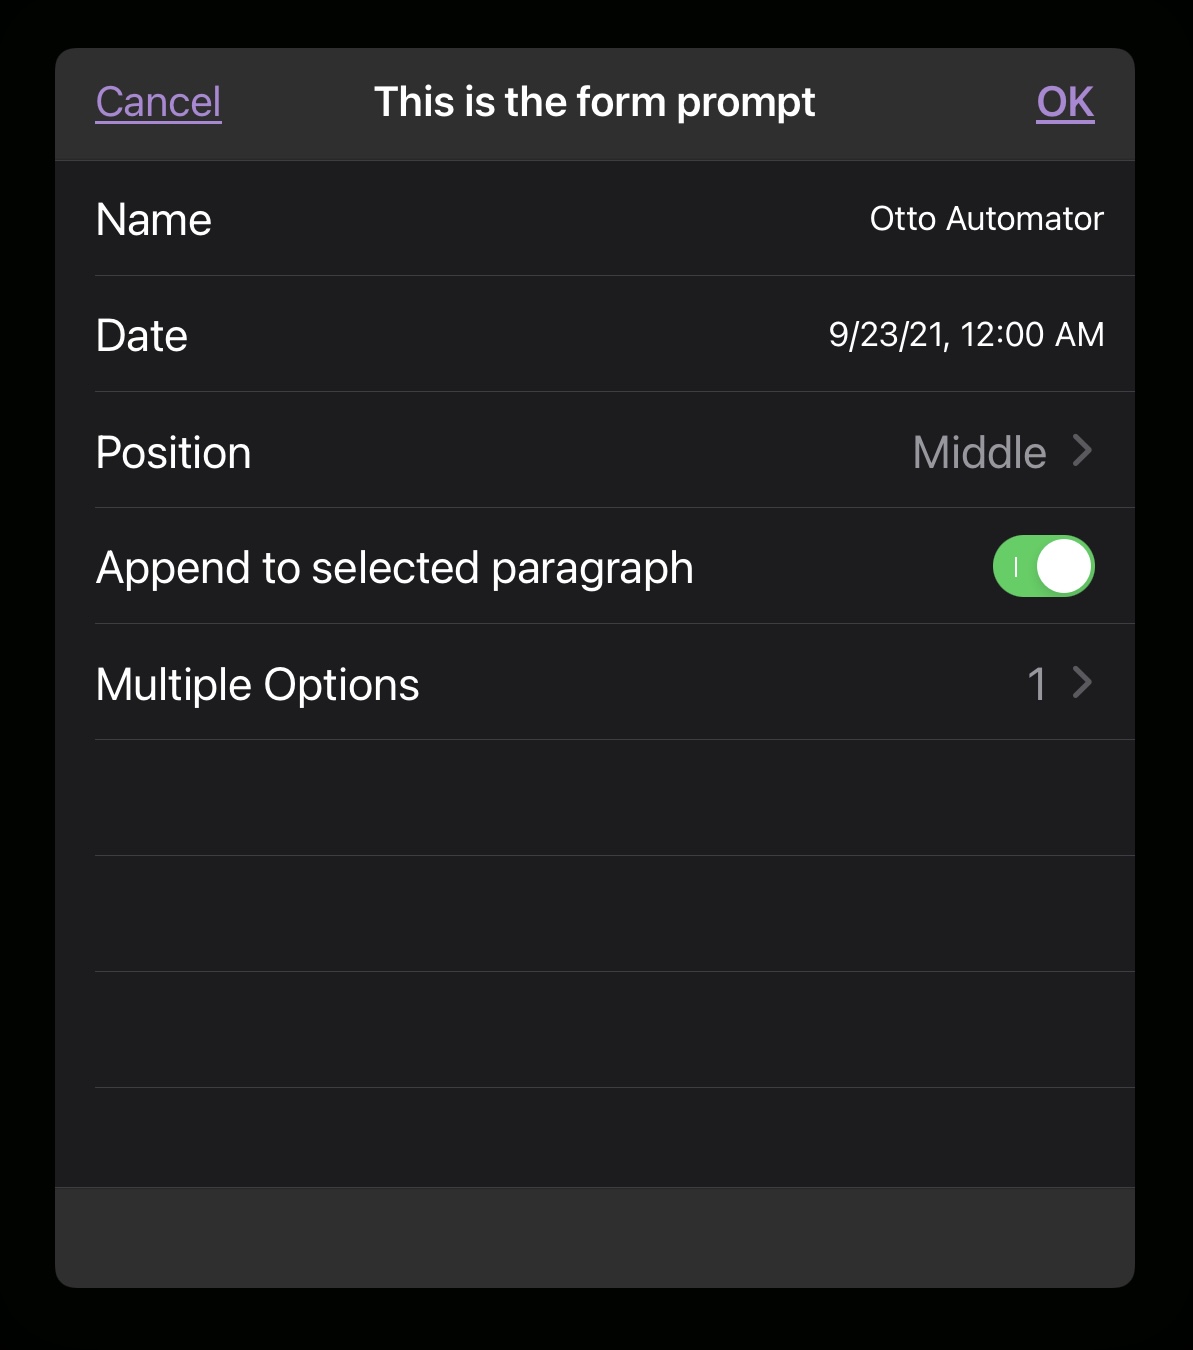
inputForm = new Form()textInput = new Form.Field.String("textInput", "Name", null)dateInput = new Form.Field.Date("dateInput", "Date", null)optionsMenu = new Form.Field.Option("menu","Position",[1,2,3],["Top", "Middle", "Bottom"],1)solitaryCheckbox = new Form.Field.Checkbox("checkbox","Append to selected paragraph",false)multiOptionMenu = new Form.Field.MultipleOptions("multipleOptions","Multiple Options",[0,1,3],["One","Two","Three"],[])inputForm.addField(textInput, 0)inputForm.addField(dateInput, 1)inputForm.addField(optionsMenu, 2)inputForm.addField(solitaryCheckbox, 3)inputForm.addField(multiOptionMenu, 4)formPrompt = "This is the form prompt"buttonTitle = "OK"formPromise = inputForm.show(formPrompt, buttonTitle)
(⬆ see above ) The resulting form on iPadOS:
(⬆ see above ) The resulting form on macOS:

Retention of Form Settings
Plug-Ins can retain and restore form settings between plug-in executions using the Preferences class (LINK).
Next
The other sections in this topic will examine how to integrate forms into actions, and how to validate and retrieve the data from a displayed form.