VOICE COMMAND INSTALLATION
Installation on macOS
On macOS, voice commands are executed using Voice Control’s built-in “Open URL” action to run an Omni Automation script encoded as a Script URL. These voice commands are stored in small XML files, with a file extension of: “.voicecontrolcommands”
Each of the examples in the Omni Voice Control Collection has links to a corresponding Voice Control commands file for macOS. These files will be used to import the commands stored in the file, into the Voice Control section of the operating system.
On macOS, the export and import of Voice Control commands files is accessed through the “Advanced Actions” menu in the Voice Control tab of the Accessibility preferences.
macOS 12
macOS 13
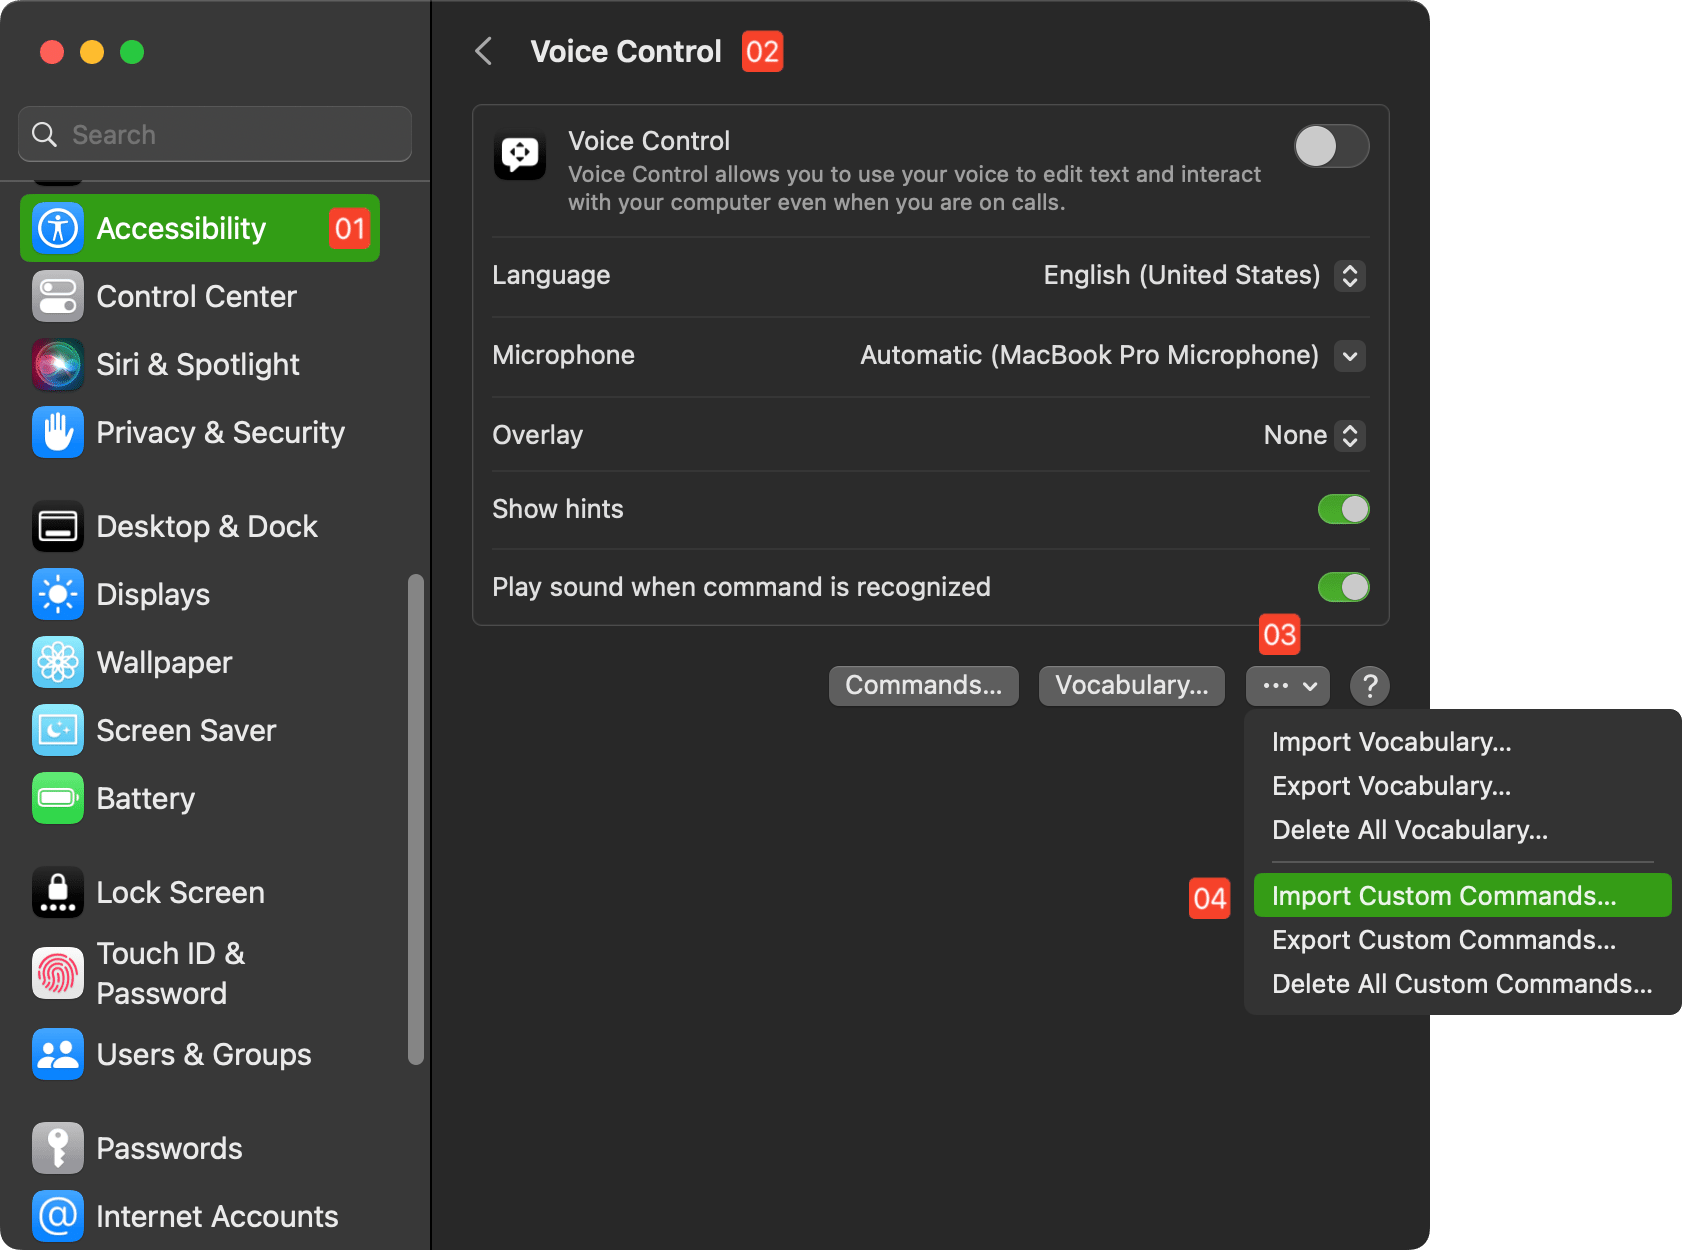
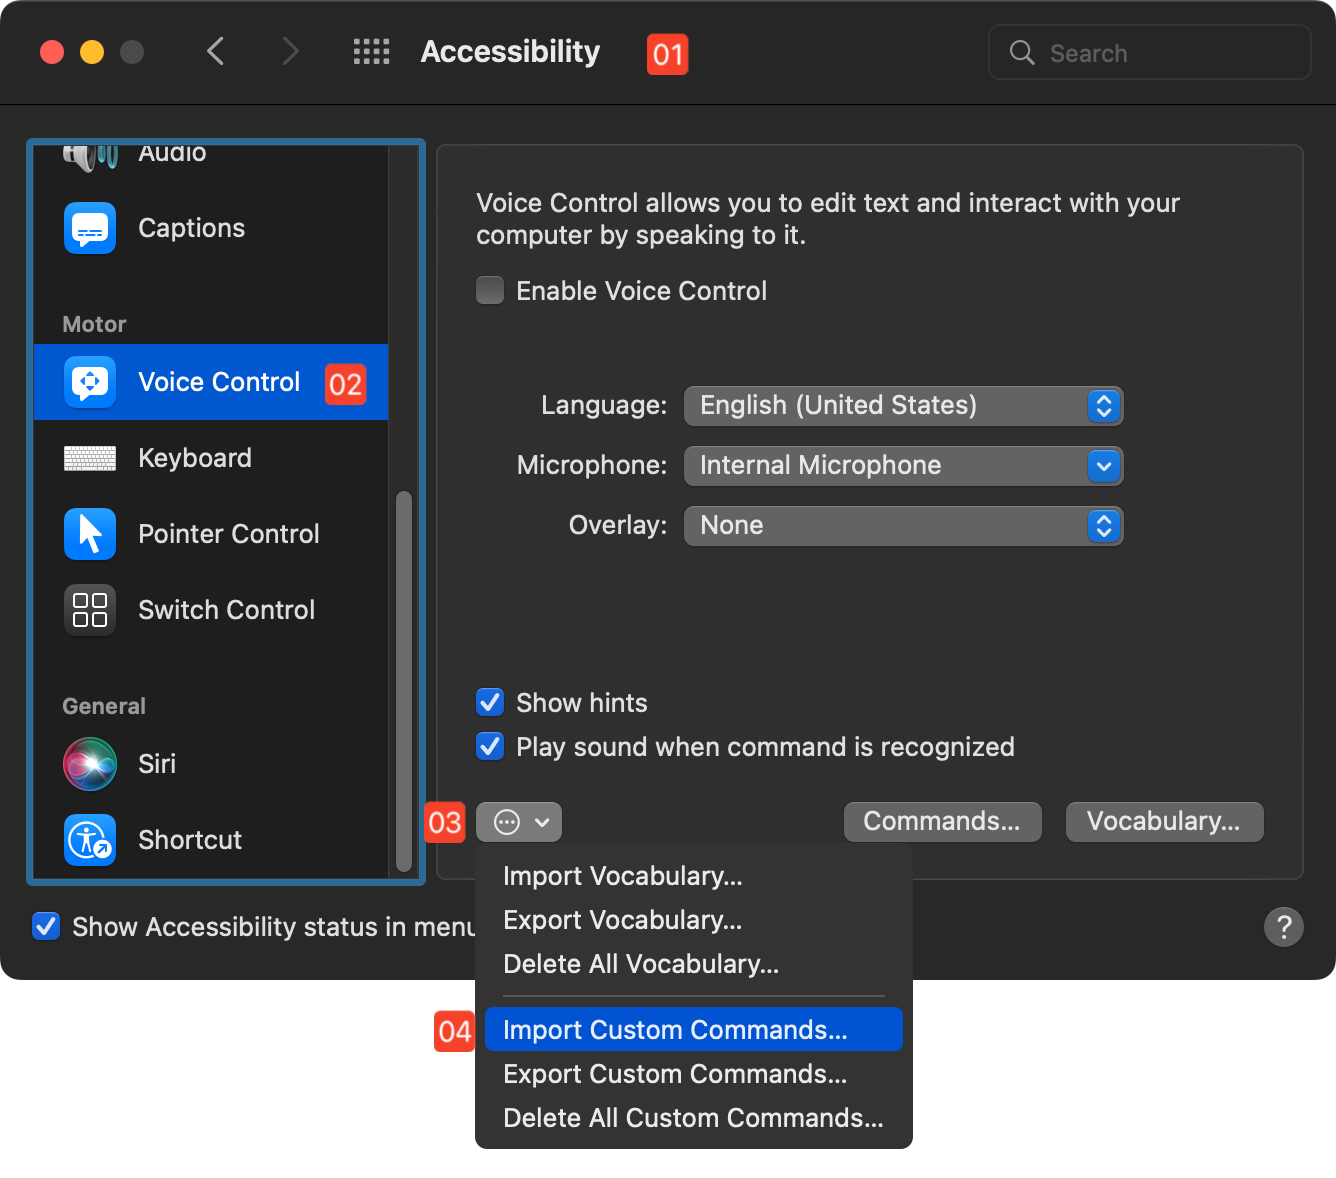
1 Accessibility Preferences • The Accessibility preferences pane in the System Preferences application.
2 Voice Control tab • The Voice Control tab of the Accessibility preferences.
3 Advanced Actions menu • This menu contains options for importing/exporting Voice Control vocabulary and commands.
4 Import Commands • Selecting this option provides the ability to import a Voice Control commands file that contains custom commands.
macOS: To install a set of Voice Control commands stored in a commands file, select the “Import Custom Commands…” menu option from the Advanced Actions menu in the Voice Control tab of the Accessibility system preference pane, and select the “.voicecommands” file to import in the forthcoming file picker dialog. The voice commands will automatically be read from the chosen file and installed for you.
IMPORTANT: For security, the execution of “external” Omni Automation scripts on iOS, iPadOS, and macOS, requires your one-time approval. Details can be found here.
Installing a Shortcut-based Command
On iOS, iPadOS, and macOS, a shortcut executed as the action for a Voice Control command is assigned a unique identifier for use on the hosting device. Unfortunately, this unique identifier is not transferable between devices, and so is not valid for use in a Voice Control commands file, which are typically designed to be portable between systems. Therefore, all “Shortcut-based” voice commands must be created individually by the user on the hosting device.
The following steps will guide through the process of creating a shortcut voice command on macOS.
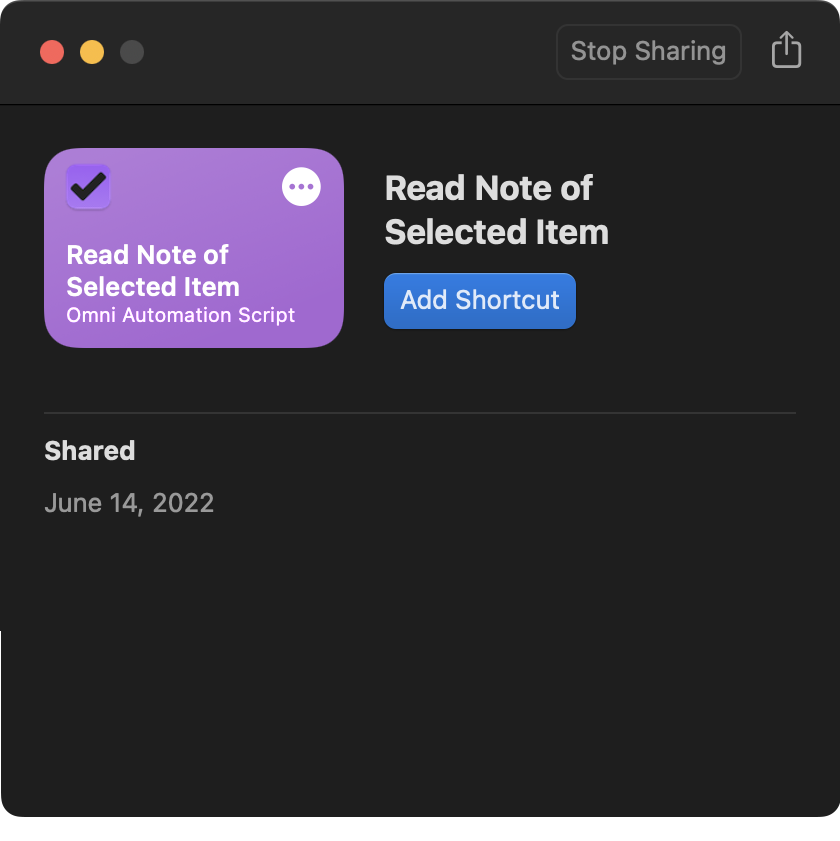
Import Linked Shortcut
The first step is to ensure that the shortcut you wish to use as the action of a Voice Control command is installed in the Shortcuts application on the host macOS device. If you are installing a shortcut from one of the examples on this website, simply click the shortcut link on the example page to summon the Shortcuts import dialog, and then click the “Add Shortcut” button:
Open the Commands Interface
With the shortcut installed, you can now begin the process of creating a new voice command that uses the installed shortcut.
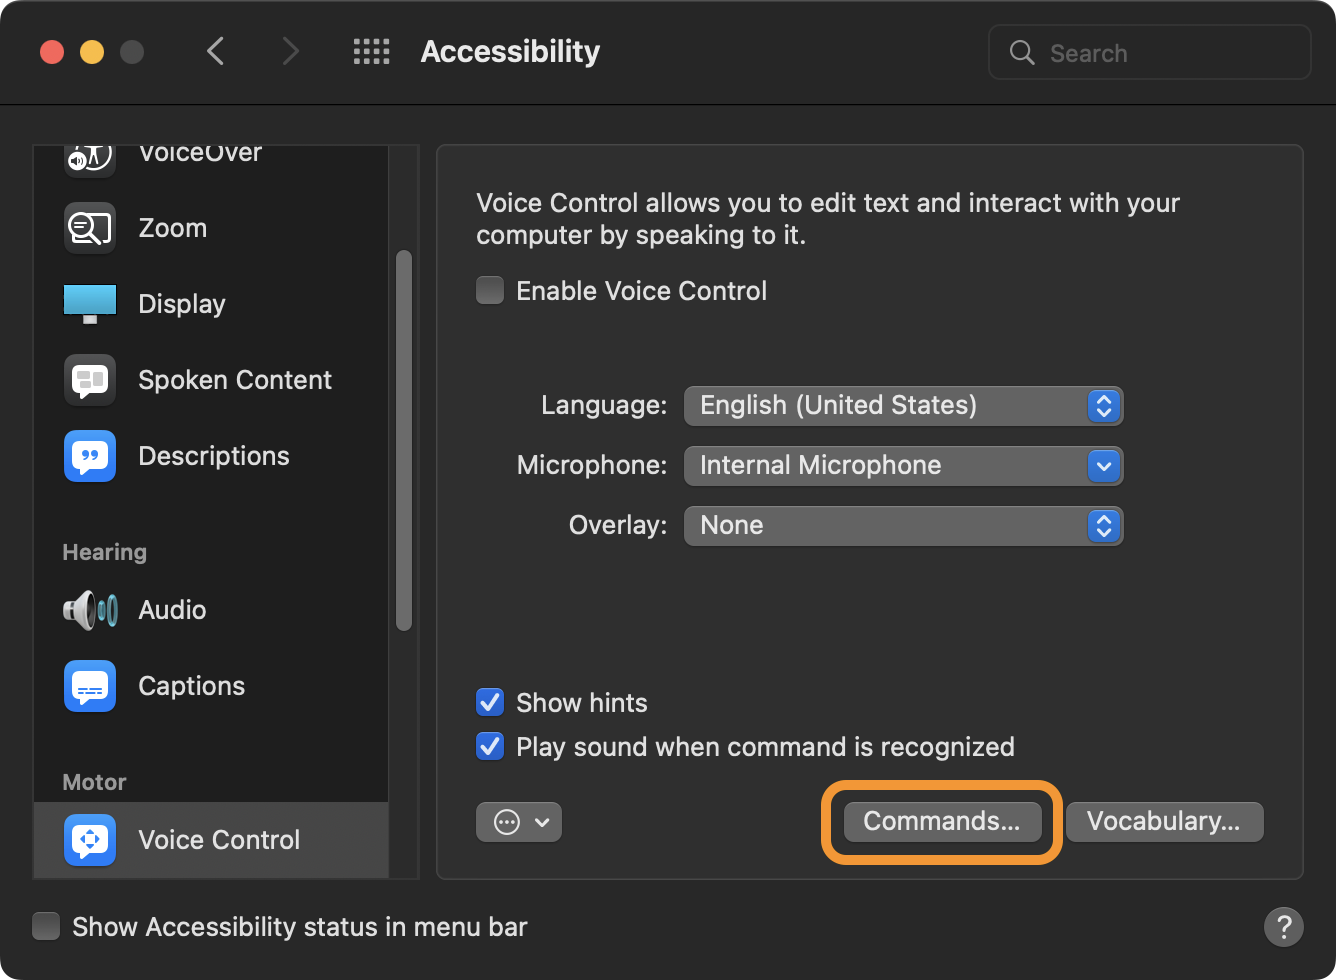
Open the Voice Control preference pane (LINK) in the System Preferences application, and click the “Commands” button at the lower right of the window to summon the interface for creating a new command:
Create a New Command
Activating the “Commands” button will summon the sheet overlay containing the views for displaying and reviewing the installed voice commands, which are grouped by function, including a group of any Custom commands.
To create a new voice command, activate the “plus” button just below the commands list view on the left of the sheet.
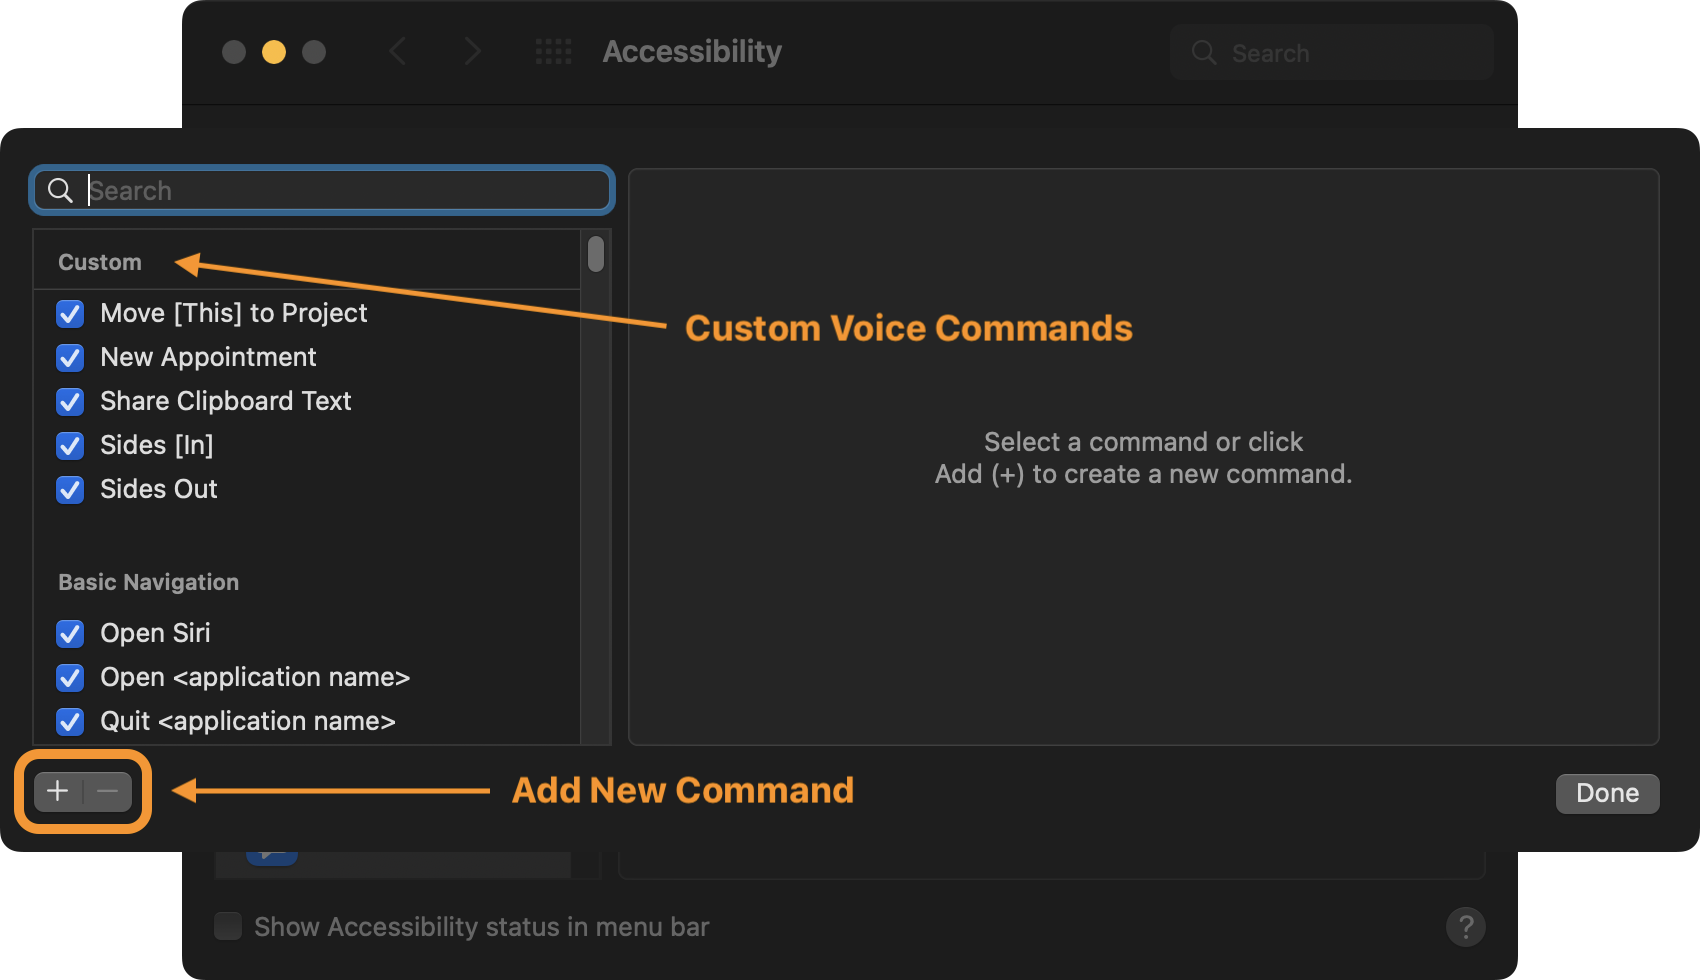
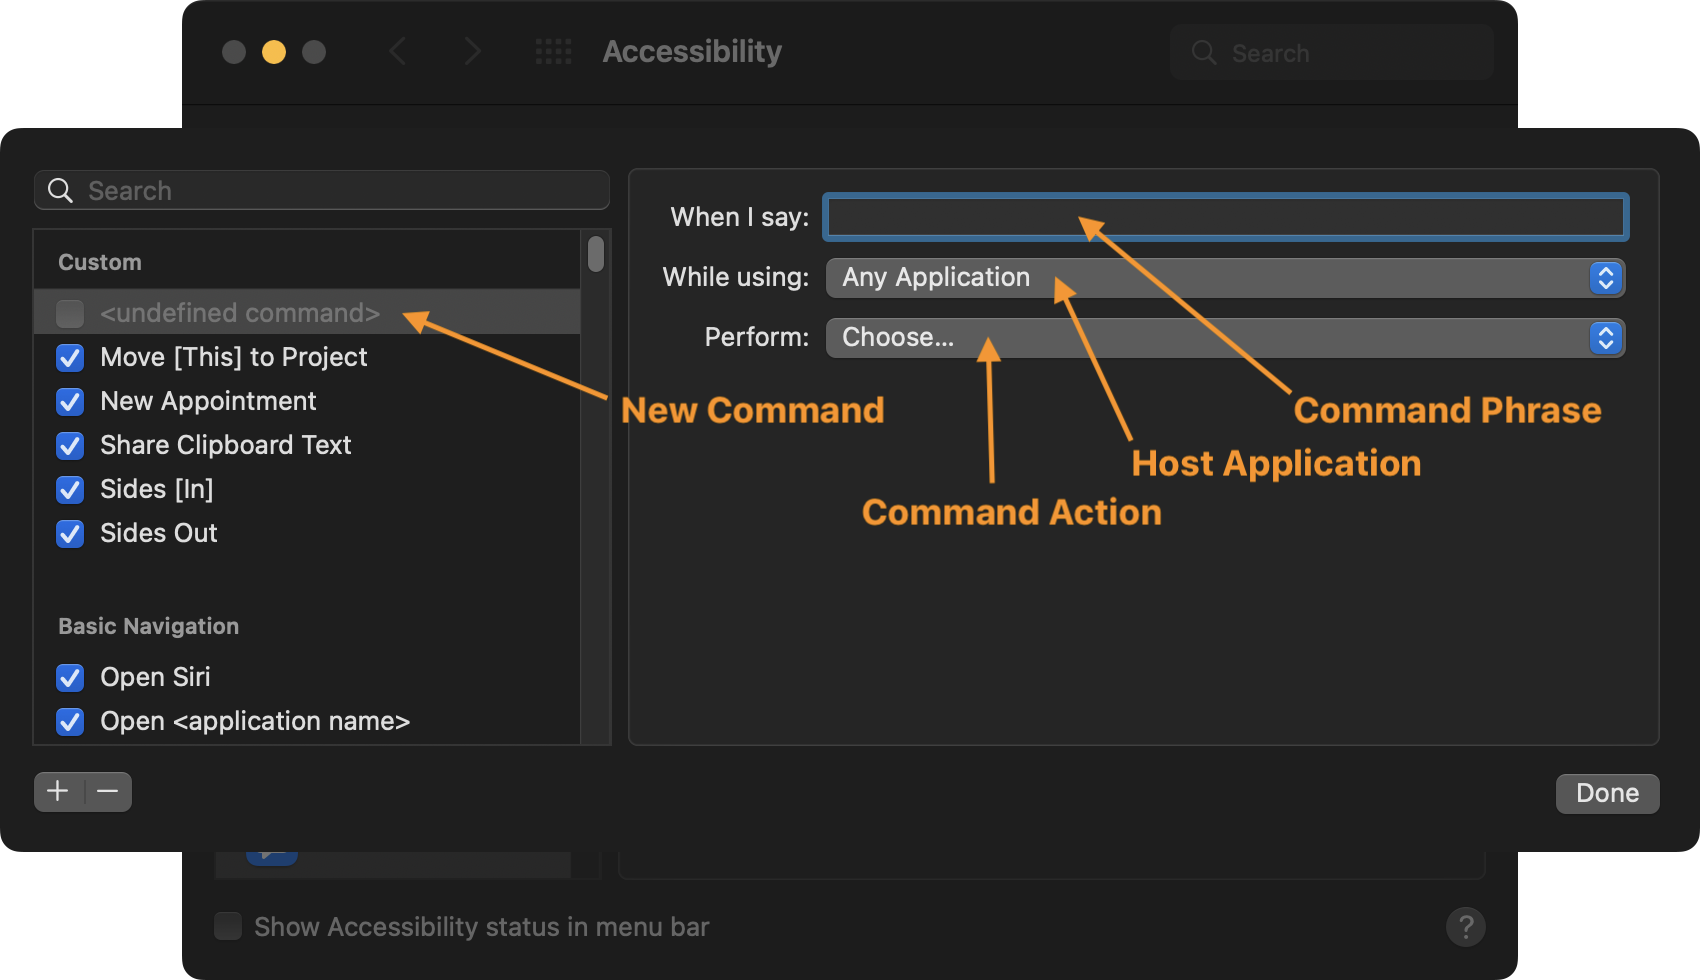
New Command Parameters
A new empty voice command will be created and added to the top of the list of installed voice commands. To the right of the list are the controls for setting the parameters of the voice command.
These controls include:
- Command Phrase Text Input field will contain the words you’ve provided to trigger the assigned voice command action.
- Host Application control determines the “scope” of the command, in other words whether or not the command will only be recognized in a specified application or if the command will be recognized in all applications (default).
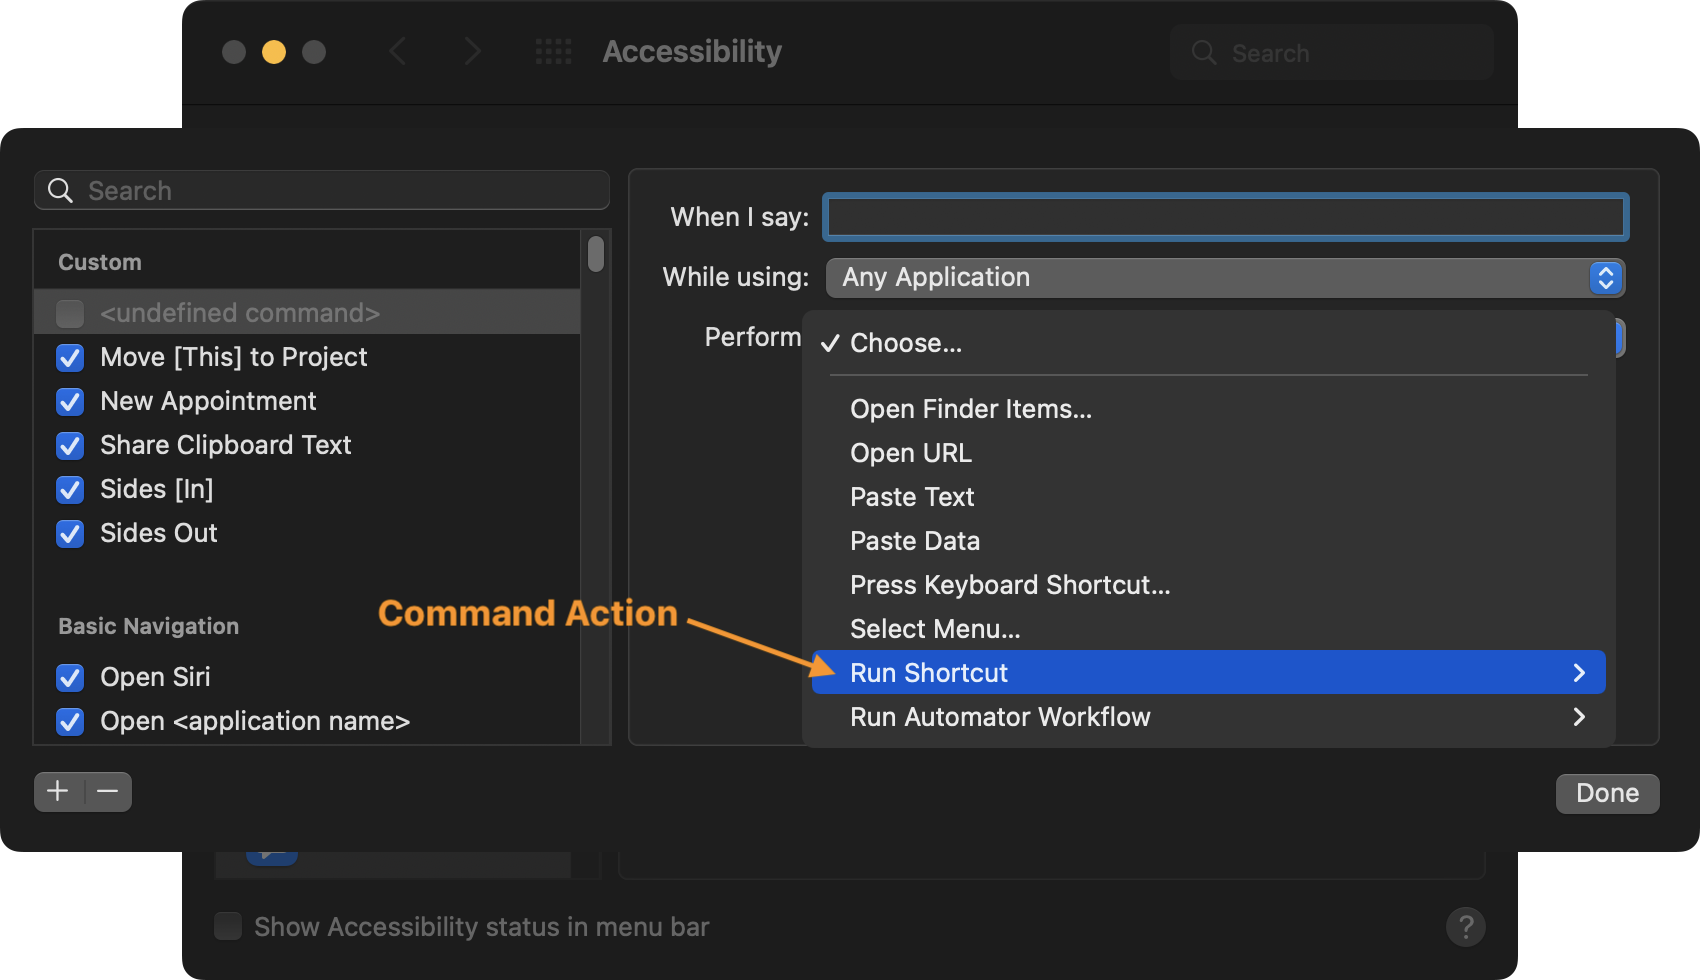
- Command Action menu contains the various types of actions that can be assigned to a voice command:
- Open Finder items
- Open a URL
- Paste Text
- Paste Data
- Press a Keyboard Shortcut
- Select a specified menu command
- Run a Shortcuts workflow
- Run an Automator workflow (deprecated)
Select the Imported Shortcut
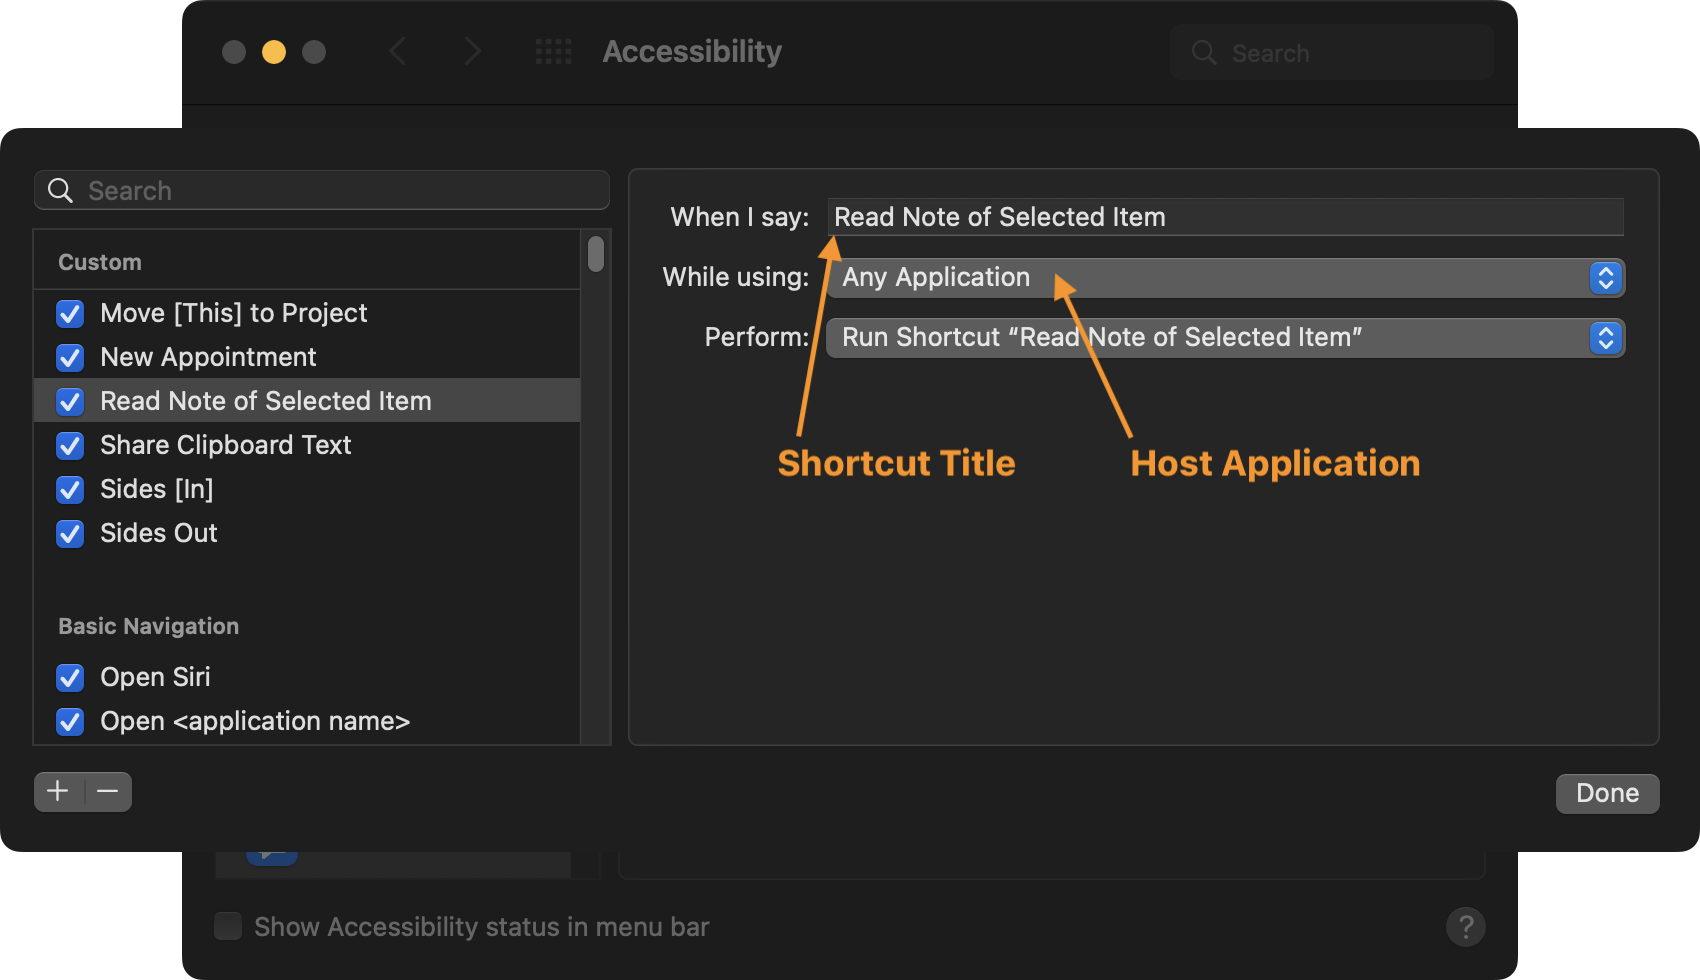
The next step is to assign the imported shortcut as the action for the new voice command. Use the Command Action (Perform) menu to select imported shortcut from the “Run Shortcut” sub-menu. Once chosen, the shortcut title will be placed into the “Command Phrase” input field.
Select the Targeted Application
Now that the shortcut has been selected and assigned, the next step is to indicate the “scope” of the voice command, in other words: when is the command available to the user? Is it available in all applications or just a specific one?
To indicate the scope as within a specific application, select the targeted application from the drop-down menu list of installed applications.
Ton indicate that the voice command should always be available, leave the menu set to the default value of: “Any Application”
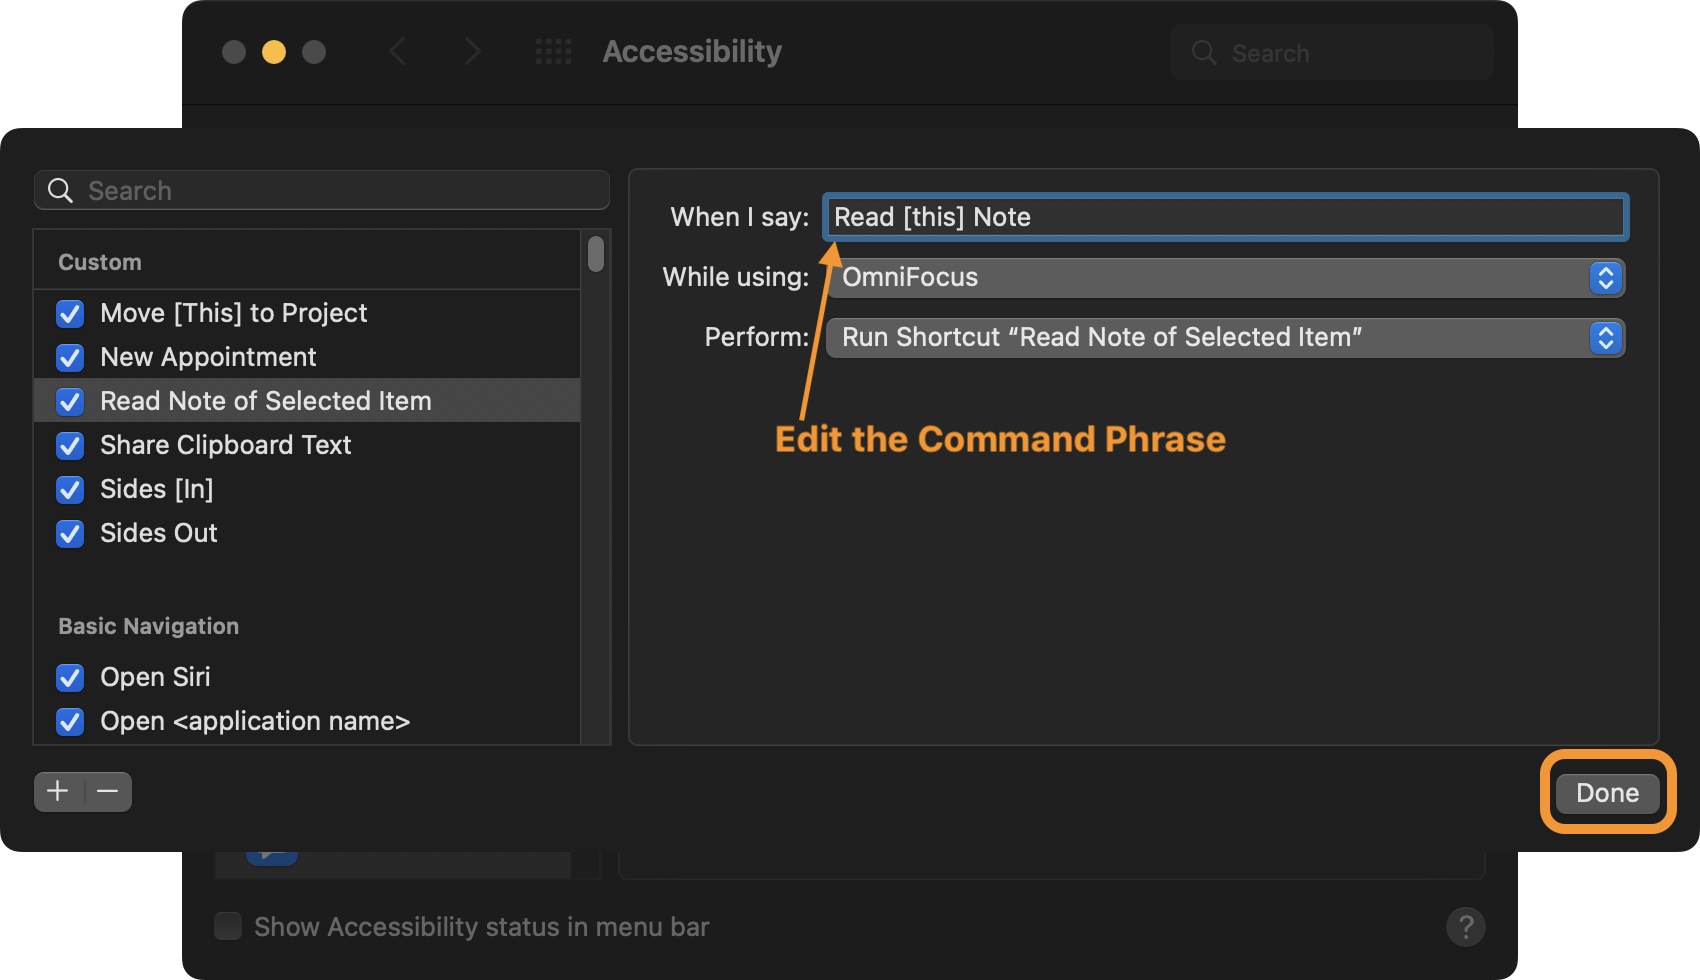
Edit the Command Phrase
The final step is edit the command phrase, which by default is the title of the chosen shortcut, to be something short, descriptive, and rememberable. Usually phrases of two to three words are the most likely to be remembered and recognized by the speech recognition engine.
In the example shown, “Read Note of Selected Item” could be easily shortened to “Read Note” without losing its context or intent.
In addition, you can insert optional words into the phrase by placing them within [brackets]. Words within brackets are optional. Phrases that use them will be recognized, but they are not required.
For example, a variation of the voice command “Read Note” could be “Read [this] Note” which would cause two phrases to be equally recognizable: “read note” or “read this note”
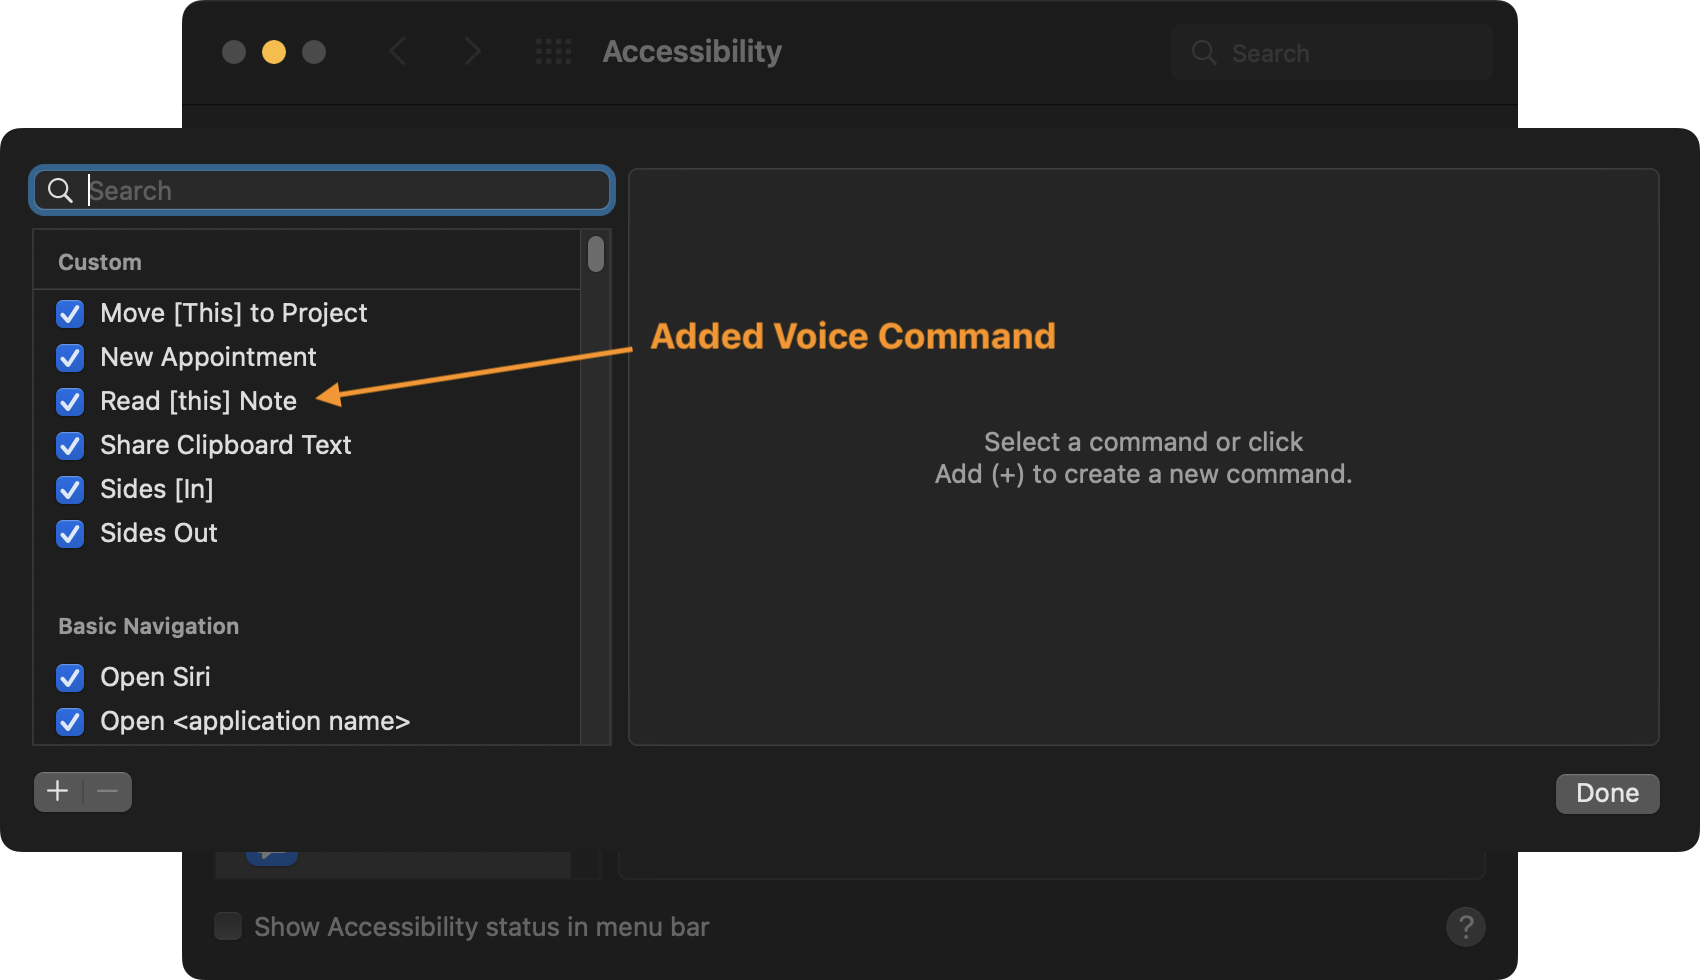
Save Changes and Close
With the voice command string edited, activate the “Done” button to save and activate the new voice command, which will now be listed with the other custom voice commands -- ready to use!
LEGAL
Permission is hereby granted, free of charge, to any person obtaining a copy of this software and associated documentation files (the "Software"), to deal in the Software without restriction, including without limitation the rights to use, copy, modify, merge, publish, distribute, sublicense, and/or sell copies of the Software, and to permit persons to whom the Software is furnished to do so, subject to the following conditions:
The above copyright notice and this permission notice shall be included in all copies or substantial portions of the Software.
THE SOFTWARE IS PROVIDED "AS IS", WITHOUT WARRANTY OF ANY KIND, EXPRESS OR IMPLIED, INCLUDING BUT NOT LIMITED TO THE WARRANTIES OF MERCHANTABILITY, FITNESS FOR A PARTICULAR PURPOSE AND NONINFRINGEMENT. IN NO EVENT SHALL THE AUTHORS OR COPYRIGHT HOLDERS BE LIABLE FOR ANY CLAIM, DAMAGES OR OTHER LIABILITY, WHETHER IN AN ACTION OF CONTRACT, TORT OR OTHERWISE, ARISING FROM, OUT OF OR IN CONNECTION WITH THE SOFTWARE OR THE USE OR OTHER DEALINGS IN THE SOFTWARE.
Mention of third-party websites and products is for informational purposes only and constitutes neither an endorsement nor a recommendation. OMNI-AUTOMATION.COM assumes no responsibility with regard to the selection, performance or use of information or products found at third-party websites. OMNI-AUTOMATION.COM provides this only as a convenience to our users. OMNI-AUTOMATION.COM has not tested the information found on these sites and makes no representations regarding its accuracy or reliability. There are risks inherent in the use of any information or products found on the Internet, and OMNI-AUTOMATION.COM assumes no responsibility in this regard. Please understand that a third-party site is independent from OMNI-AUTOMATION.COM and that OMNI-AUTOMATION.COM has no control over the content on that website. Please contact the vendor for additional information.