Bundle Plug-Ins
Omni Automation Plug-Ins are a great way to deliver organized contextual automation tools for Omni applications in both macOS and iOS. Omni Automation plug-ins may created as either solitary files containing a single action, or as bundle files containing or more actions, libraries, and other supporting files and images. A “bundle” is essentially a folder that appears in the Finder or Files app as a single file.
This section details the design of bundle plug-ins, beginning a description of two typical bundle components:
- Actions • are Omni Automation scripts that perform automation tasks. Actions can be selected from its host Plug-In’s sub-menu displayed in the application’s Automation menu, or may be assigned keyboard shortcuts. Actions can even be added by the user to the application’s toolbar, and there is no minimum or limit on the number of actions a bundle plug-in may provide.
- Libraries • are JavaScript files containing specialized automation routines or functions, usually related to a single topic or purpose. The functions of a library can be accessed by both actions and external Omni Automation scripts. A bundle plug-in may contain no libraries, one library, or multiple libraries. Also note that libraries may be saved as solitary files not requiring inclusion in a bundle to be activated. (documentation)
The Plug-In Bundle
Omni Automation bundle plug-in files are “bundles,” which are essentially folders that appear as files. Within a plug-in bundle are the files and directories that define the manner in which the plug-in provides its functionality.
To assist you in understanding and creating your own bundle plug-ins, fully editable templates for each Omni application are available for download:
- OmniFocus • Download an editable basic bundle template
- OmniPlan • Download an editable basic bundle template (demo files)
- OmniOutliner • Download an editable basic bundle template
- OmniGraffle • Download an editable basic bundle template
To open the unarchived Plug-In bundle on macOS, right-click the file and choose “Show Package Contents” from the Finder’s contextual menu.
The illustration below shows the hierarchy and contents of an Omni Automation Plug-In bundle:
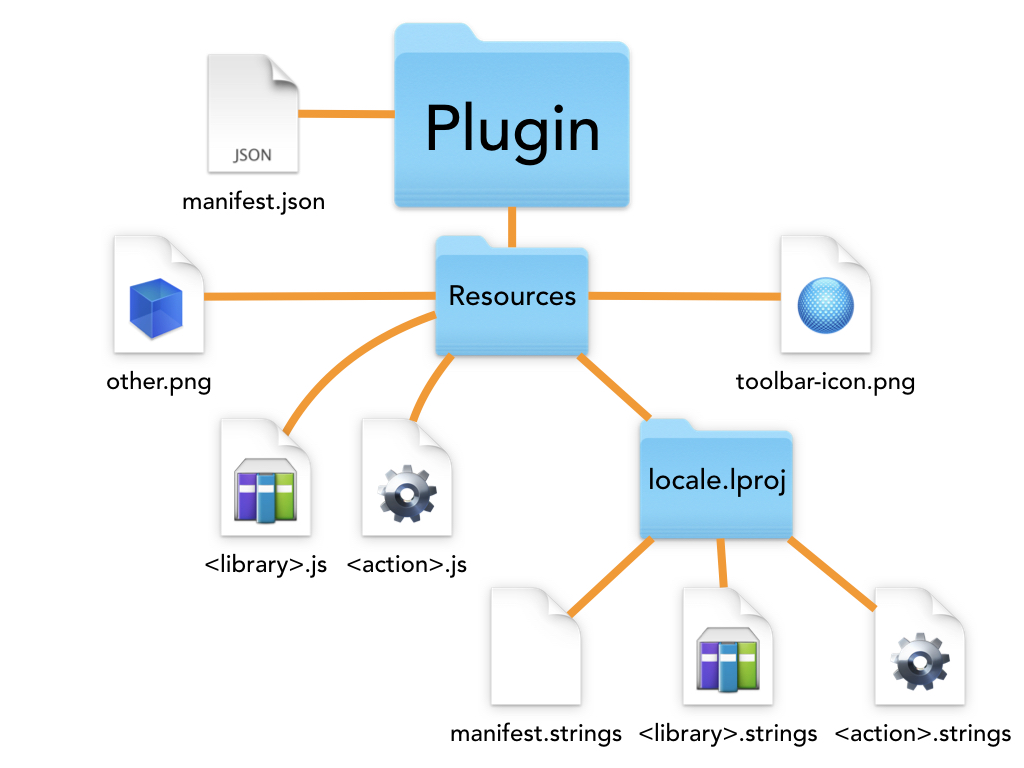
At the topmost level in the bundle folder are two items:
- The manifest.json file is a JSON (JavaScript Object Notation) document that details the Plug-In’s essential information and components
- The Resources folder contains all Plug-In elements aside from the manifest.json file
The Manifest
The Plug-In manifest JSON text file contains between 5 to 7 keys and their corresponding values.
Bundle Plug-In Manifest
{"defaultLocale":"en","identifier": "com.YourIdentifier.NameOfPlugIn","author": "Your Name or Organization","description": "A collection of actions (scripts) for NameOfApp.","version": "1.0","actions": [{"identifier": "myFirstActionFileName","image": "1st-action-toolbar-icon.png"},{"identifier": "mySecondActionFileName","image": "2nd-action-toolbar-icon.png"}],"libraries": [{"identifier": "MyFirstLibraryFileName"},{"identifier": "MySecondLibraryFileName"}]}
- The value for the key defaultLocale is used to indicate the default language used to render the Plug-In’s menu items.
- The value for the key identifier is a text string (without spaces) representing your company or development identity. These identifiers usually follow the format shown in the example.
- The value for the key author is the name of the person or company who created the Plug-In,
- The value for the key description is a short explanation of the Plug-In’s automation features.
- The value for the key version is a numeric string in standard version format: 1.x or 1.x.x
- The value of the actions key is an array of key:value pairs for identifying the actions (scripts) provided by the Plug-In. Each action entry contains two key:value pairs:
- The identifier key has a value that is the file name of the JavaScript corresponding action file without its file extension of “.js”.
- The image key has a value that is the name of the image file (with file extension) that is the toolbar icon for the action. OPTIONALLY (req: macOS 11/iOS 14/iPadOS 14): the value of this key can be the assigned name of a specified Apple SF Symbols character, such as: "newpaper.fill". For a complete catalog of SF Symbols characters, download the SF Symbols application from Apple.
- The value of the libraries key is an array of key:value pairs for identifying any libraries provided by the Plug-In. Each library entry contains a single key:value pairs: the value of the identifier key is the file name of the JavaScript corresponding library file without its file extension of “.js”.
The Manifest Strings file
The mainfest.strings file, located in the localized project folder within the Resources folder, is a text file containing a single key:value pair indicating the Plug-In name that should be displayed to the user in any menus. The key of the manifest.strings file is the value of the Plug-In identifier key from the manifest.json file. The value of the key is the localized string for the Plug-In name. (Note the inclusion of an ending semicolon character)
Manifest Strings
"com.youOrCompanyID.nameOfPlugIn" = "Plug-In for Your App";
The Resources folder
The Resources folder contains all other Plug-In components, including:
- Actions • Actions are JavaScript scripts written using Omni Automation and are saved as text files with the file extension of: .js
- Libraries • Libraries are also JavaScript scripts containing one or functions written using Omni Automation and are saved as text files with the file extension of: .js
- Toolbar Icons • Are small images that are placed by the user on the application’s toolbar to provide a direct touch|click means for executing the Plug-In action.
- Other resources • Omni Automation Plug-Ins may contain their own optional resources such as images, databases, and text files. These items may be accessed by the Plug-In’s actions.
IMPORTANT: In the illustration of the plug-in folder heirarchy, the placeholders for the libary and action file names are encased within < > characters. Replace these placeholders with the file names of the individual action and library files. TIP: use filenames without spaces: my-action-filename.js, my-action-filename.strings
- Localized Project Folders • Because Omni Automation Plug-Ins may be designed to work with multiple languages, localization tables that match user-visible text to corresponding translations are placed within project folders whose name begins with the standard locale abbreviation for the target language, and end with the file extension of: lproj
- For example, the localized project folder for U.S. English is named: en.lproj and the localized project folder for French is: fr.lproj Each language gets its own localized project folder.
- Within the localized project folder are placed text files (with file extension: .strings) for each action and library file contained in the top-level of the Resources folder. These files are covered in detail in the Actions and Libraries sections of this website.
Plug-In File Extensions
When creating a bundle plug-in from scratch, start with a folder and add the various elements described in this documentation. When completed, rename the folder to the name for plug-in appended with one of the following file extensions.
omnifocusjs, omnioutlinerjs, omnigrafflejs, omniplanjs
After approving the forthcoming dialog in the macOS Finder, the folder icon will automatically change to the appropriate Omni plug-in icon, and the bundle will be treated as if it were a single file.
Plug-In Actions
The work of an Omni Automation plug-in is accomplished by its “actions.” Bundle plug-ins may have one or more actions, expressed in individual JavaScript files stored within the plug-in bundle.
An Omni Automation action is comprised of JavaScript functions placed within a self-invoking anonymous (unnamed) JavaScript arrow function. This anonymous (unnamed) function wrapper is used to minimize the chance of conflicts with other actions whose code statements contain variables using the same titles as those used in other actions.
Basic Bundle Action Template
(() => {const action = new PlugIn.Action(function(selection, sender){// action processing code goes here});action.validate = function(selection, sender){// perform any status checks and return a boolean valuereturn true};return action;})();
The following are the essential components for creating an Omni Automation action:
- The action plug-in object • A new instance of the PlugIn.Action class is created and stored in the variable; action. The action object’s value is a function that will contain the action’s processing code (the Omni Automation script). Note that the current document selection object and the sender (triggering) object are automatically passed into the function.
- The action validation • A optional routine that returns a boolean (true or false) value that indicates whether the action should be available for execution, usually based upon whether appropriate objects are selected in the document. If your action does not require an active selection in the document, then simply return a value of true (see example below) or omit this function. The result of the validation routine determines if the action’s menu item in the application’s Automation menu, is enabled.
- A statement returning the created action object to the wrapping function so it may be executed (run).
Selection Input
The action declaration and validation handlers include two input parameters in their functions:
- selection • The selection parameter is the Selection object of the host application. This object contains references to the application elements currently selected in the application interface. Of course, this list of elements varies with each Omni application:
- OmniFocus: database, folders, projects, tags, tasks, window, allObjects, databaseObjects, and document
- OmniPlan: project, resources, and tasks
- OmniGraffle: canvas, document, graphics, lines, solids, and view
- OmniOutliner: allObjects, columns, document, editor, items, nodes, outline, and styles
Selection Object Parameter
const action = new PlugIn.Action(function(selection, sender){// OmniFocus: selected tasksselection.tasks// OmniPlan: selected resourcesselection.resources// OmniGraffle: selected non-line graphicsselection.solids// OmniOutliner: selected rowsselection.itemsselection.nodes});
- sender • The sender parameter contains a reference to the object that triggers the execution of the plug-in. The value of the sender parameter can be one of three types:
- An instance of the MenuItem class, meaning that plug-in was triggered via either the Automation or Share menus.
- An instance of the ToolbarItem class, meaning that the plug-in was triggered by a toolbar item.
- A value of undefined if the plug-in was triggered by another script.
The sender parameter is documented in detail in the Sender Parameter section of this website.
Validation Function
The value returned by the Validation Function of the PlugIn.Action instance determines whether or not the action is enabled or disabled in the application interface. A returned value of true means that the Automation Menu, Share Menu, and any corresponding Toolbar Item will be enabled for use. A returned value of false will make those disabled.
NOTE: Use of the Validation Function is optional. If omitted from the action code, a result value of true will be assumed by the plug-in.
The Validation Function is often used to ensure that the items necessary to be processed by the plug-in are indeed currently selected in the application interface. Here are examples of the Validation Function using the passed-in selection parameter to identify selected items:
Validation Function
action.validate = function(selection, sender){// validation codereturn a value that is either true or false};
OmniFocus: Single Task whose Name begins with “Call”
action.validate = function(selection, sender){return (selection.tasks.length === 1 &&selection.tasks[0].name.startsWith("Call"))};
OmniPlan: One or More Resources Selected
action.validate = function(selection, sender){return (selection.resources.length > 0)};
OmniGraffle: Single Selected Shape with Text
action.validate = function(selection, sender){return (selection.solids.length === 1 &&selection.solids[0].text != "")};
OmniOutliner: One or More Columns Selected
action.validate = function(selection, sender){return (selection.columns.length > 0)};
The Action File
Actions are saved as JavaScript script files with the file extension of: .js They are placed at the top-level within the PlugIn bundle’s Resources folder.
Since the name of an action file also serves as its identifier, its file name should not contain spaces or special characters.
The Action Strings File
Localized titles and/or descriptions of an action are displayed to the user in three ways:
- As the label for a toolbar button
- As a tooltip displayed when the user places the cursor over a toolbar button.
- As the text of a menu-item in the host application’s Script menu.
- These localized labels/strings are determined by the values provided in the action.strings file, which is placed within the localized project folder within the bundle’s Resources folder.
Action Strings File
"label" = "About this PlugIn…";"shortLabel" = "About…";"mediumLabel" = "About PlugIn";"longLabel" = "Information about this PlugIn";"paletteLabel" = "About…";
The Action Icon File
Each action should have its own toolbar icon. Typically, these icons are image files (saved in PNG format) that are indicative of the type of task the action performs, like these:


Save your toolbar icons as 48x48 PNG files with 144 pixel resolution, and place them within the plugin’s Resources folder.
IMPORTANT: (req: macOS 11/iOS 14/iPadOS 14): as an alternative to using an image file, a plug-in’s icon can be a specified Apple SF Symbols character identified by its assigned name, such as: "newpaper.fill". See the section on this page about the bundle plug-in manifest. For a complete catalog of SF Symbols characters, download the SF Symbols application from Apple.
Importing Bundle Resource
In this example action, an image file located within the Plug-In’s Resources folder, is placed onto the current OmniGraffle canvas.
The image resource is identified using the resourceNamed() function of the PlugIn class (documentation).
Import Image Resource
(() => {var action = new PlugIn.Action(function(selection){let plugin = action.plugInlet imageFileName = "ImageName.png"let = plugin.resourceNamed(imageFileName)url.fetch(function(data){let aRect = new Rect(0, 0, 72, 72)let cnvs = document.windows[0].selection.canvaslet aGraphic = cnvs.addShape('Rectangle', aRect)aGraphic.strokeThickness = 0aGraphic.shadowColor = nullaGraphic.fillColor = nullaGraphic.image = addImage(data)aGraphic.name = imageFileNamelet imageSize = aGraphic.image.originalSizelet imgX = imageSize.widthlet imgY = imageSize.heightaGraphic.geometry = new Rect(aGraphic.geometry.x, aGraphic.geometry.y, imgX, imgY)document.windows[0].selection.view.select([aGraphic])})});// routine determines if menu item is enabledaction.validate = function(selection){return true};return action;})();
Bundle Plug-In Libraries
Omni Automation Libraries provide the means for storing, using, and sharing your favorite Omni Automation functions. They can make your automation tasks easier by dramatically shortening your scripts, and they enable the ability to share useful routines with other computers and tablets.
IMPORTANT: Bundle Plug-In libraries are similar to single-file library plug-ins, but their metadata is presented differently. Creating single-file library plug-ins is documented in detail in the Library section of the Plug-Ins sub-site. The following documentation is about creating bundle plug-in libraries.
In bundle plug-ins, libraries exist as JavaScript script files (.js) placed within the Resources folder in plugin bundles. The functions contained within a Omni Automation Library can be called from within the host plug-in’s actions, or by scripts executed outside of the host plugin.
An Omni Automation bundle plug-in library is essentially a JavaScript script, comprised of a single function that is executed when the library is called (line 16). Within the main function (line 1 ~ line 15) a library object is created (line 2), and the various library functions are added to the library object (line 4, line 9). The main script finishes by returning the created library object populated with the handlers you added (line 14).
Bundle Plug-In Library
(() => {var myLibrary = new PlugIn.Library(new Version("1.0"));myLibrary.myFirstFunction = function(passedParameter){// function codereturn myFirstFunctionResult}myLibrary.mySecondFunction = function(passedParameter){// function codereturn mySecondFunctionResult}return myLibrary;})();
Libraries can contain as many functions as you find useful to include. The example shown above contains two library functions that can be called from within your plugins or scripts.
Library files are saved with the file extension: .js (which stands for JavaScript) and are placed in the Resources folder in the plugin bundle. IMPORTANT: For bundle plug-in libraries is best to avoid using spaces or special characters like dashes in the filenames of your libraries.
Registering the Bundle Plug-In Library
In order to be available to the user, libraries must be registered by including them in the plugin’s manifest.json file. This file contains metadata about the plugin, as well an array of plugin actions (line 7), and an optional array of one or more libraries (line 17).
Each action element is comprised of a key:value pair for the action’s identifier (filename) (lines 9, 13) and the filename of its corresponding toolbar icon image file (lines 10, 14).
Each library element is comprised of a key:value pair (lines 19, 22) for the library’s identifier, which is the library’s filename without the file extension.
Bundle Plug-In Manifest
{"defaultLocale":"en","identifier": "com.YourIdentifier.name-of-plug-in","author": "Your Name or Organization","description": "A collection of actions (scripts) for NameOfApp.","version": "1.0","actions": [{"identifier": "myFirstAction","image": "toolbar-icon.png"},{"identifier": "mySecondAction","image": "toolbar-icon.png"}],"libraries": [{"identifier": "MyFirstLibraryFileName"},{"identifier": "MySecondLibraryFileName"}]}
Calling Bundle Plug-In Library from a Bundle Plug-In Action
The example code shown below is of a plug-in action. It is comprised of two sections: the validation code (line 14), and the execution code (line 4).
The validation section (line 14) is used to determine if the action should execute, based upon whether or not there is a selection in the frontmost document. If your action does not rely upon a selection, simply return true (15) as shown in the example.
In the following example, the library file names are: StencilLib and ShapeLib
Calling Bundle Library from Bundle Action
(() => {var action = new PlugIn.Action(function(selection, sender){// call using “this” keyword & library file name (no spaces or special characters!)var stencilLib = this.StencilLibvar shapeLib = this.ShapeLib// call library functions using referencesvar names = stencilLib.getStencilNames()var aGraphic = shapeLib.shapeWithContentsOfArray(names)// select the created graphicdocument.windows[0].selection.view.select([aGraphic])});// validation function determines if menu item is enabledaction.validate = function(selection, sender){return true};return action;})();
Loading a library is accomplished by simply appending the library identifier (filename) to the global object: this. In the example shown above two libraries are loaded into variables (line 4, 5).
Once the libraries have been loaded, any library functions can be called by appending the name of the function to the variable representing the host library (lines 7, 8).
Calling a Bundle Plug-In Library from an External Script or Plug-In
Calling into libraries within an external script is a slightly more involved process in that you must first identify the plugin that contains the library whose functions you wish to access.
In the example below, the plug-in is located using the find method on the Plugin class, and the plugin’s identifier. If the plugin is installed, then an object reference to the plug-in is returned and stored in a variable (line 2). If the plug-in is not installed, a value of null will be returned and the next line in the script (line 3) will throw an error indicating its status as missing.
Once the plug-in has been successfully identified, any libraries can be loaded using the library method on the plugin reference stored previously in a variable (lines 5, 7).
Once the library or libraries have been loaded, their functions can be accessed by appending the function name to the variable containing the loaded library (lines 9, 11).
Calling Bundle Plug-In Library Externally
// locate the plugin by identifiervar plugin = PlugIn.find("com.YourIdentifier.name-of-plug-in")if (plugin == null){throw new Error("Plug-in is not installed.")}// load a library identified by namevar firstLibrary = plugin.library("NameOfFirstLibrary")// load a library identified by namevar secondLibrary = plugin.library("NameOfSecondLibrary")// call a library function by namevar aVariable = firstLibrary.nameOfLibraryFunction()// call a library function by namesecondLibrary.nameOfLibraryFunction(aVariable)
Here is more documentation regarding accessing plug-ins from external sources.
Accessing the Plug-In Remotely
Omni Automation plug-ins can be called from external scripts or plug-ins. (documentation)