Items
When working in the outline, the building blocks of your content are referred to as rows.
Rows can appear as simple as a line of text, but many outline styles also display other common components to the row such as handles, notes, and status checkboxes. Rows can also span multiple columns (if your document has more than one column).
In scripting terms, rows are items, which are instances of the Item class.
The Root Item
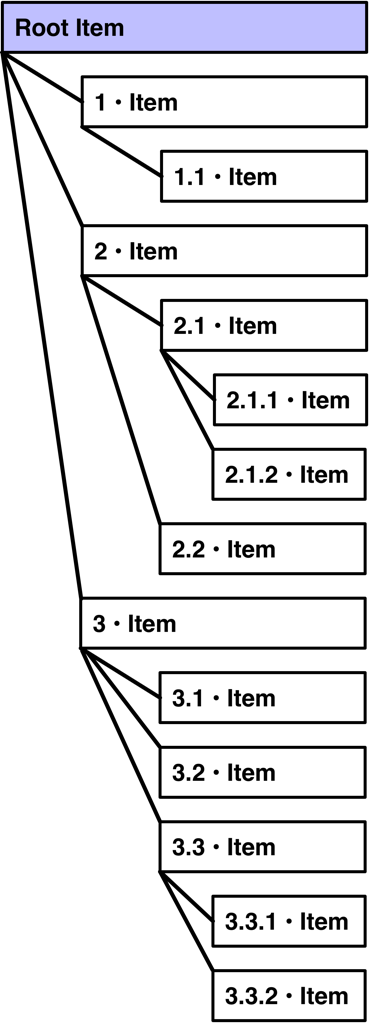
All rows in an outline are children or descendants of an invisible item called the the rootItem. The value of the rootItem property of the outline class, it is the invisible topmost item in the hierarchy of the topic column.
rootItem (Item r/o) • A property of the Outline class, rootItem returns the root item of the topic column of the outline. This item isn’t displayed in the document, but is the parent of all the “top level” items.
As shown in the illustration of hierarchical examples on this page, the rootItem is always the topmost element in the hierarchy.
NOTE: Since the document outline is the implied top of the hierarchy, the rootItem property can be used by itself without need to reference its parent outline, as in this script for getting the number of rows in the outline:
Root Item
rootItem.descendants.length
Referencing rootItem of a New Document
TIP: if your script needs to access the rootItem of a document created by the script itself, use the rootNode property of the current instance of the Editor class to derive the rootItem object of the new document. To avoid a name space conflict, do not store the referenced rootItem in a variable named “rootItem”, use a variable titled something like “baseItem” instead:
New Document with Row
Document.makeNewAndShow(doc => {baseItem = doc.editors[0].rootNode.objectbaseItem.addChild(null,item => {item.topic = 'HELLO WORLD'})})
Item “Relational” Properties
The items (rows) of an outline document have relationships that are defined using terms that are similar to those used to describe a human relationships in an ancestral hierarchy. For example, an item may have children, siblings, descendants, and ancestors. Here are the relational properties of the item class:
ancestors (Array of Item r/o) • Returns a list of all the ancestors of this item, up to but not including the root item of the Outline.
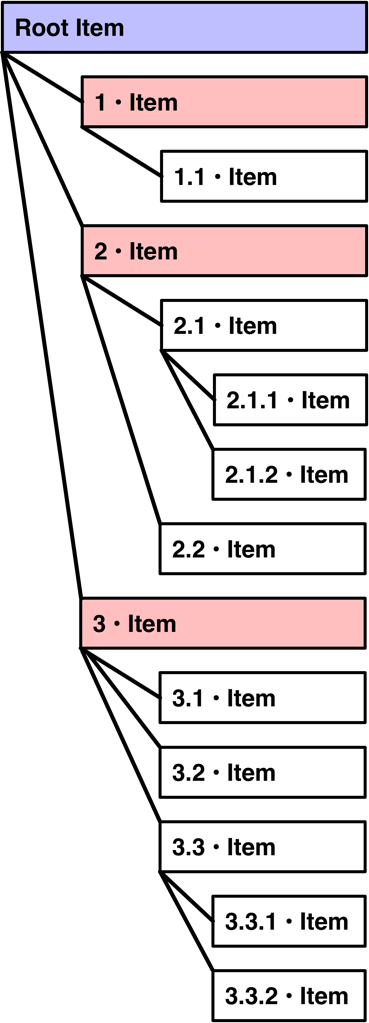
children (Array of Item r/o) • Returns the list of items contained by this Item. Note that if the Editor has sort orderings specified, or there is a filter in place, the order and number of items returned here may differ from what is seen at the Tree level.
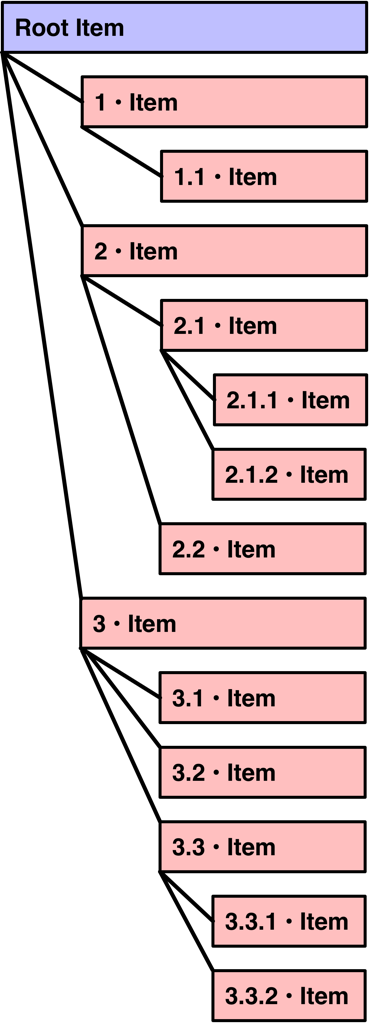
descendants (Array of Item r/o) • Returns a breadth-first ordered array of all the descendants of this Item.
followingSiblings (Array of Item r/o) • Returns an array of all the Items that share the same parent that are also ordered after this Item.
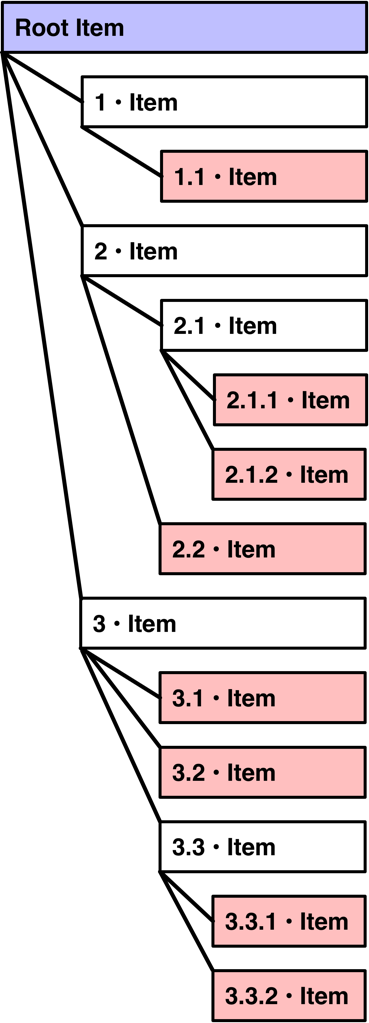
leaves (Array of Item r/o) • Returns a list of all the items contained by this Item that have no children. If this item has no children, an empty array is returned (an Item isn’t considered its own leaf).
parent (Item or nil r/o) • Returns the item that contains this item, or null if this is the root item.
precedingSiblings (Array of Item r/o) • Returns an array of all the Items that share the same parent that are also ordered before this Item.
sections (Array of Item r/o) • Returns a list of the items under this tiem that are considered sections. These are the top-level items which are expanded in the sidebar.
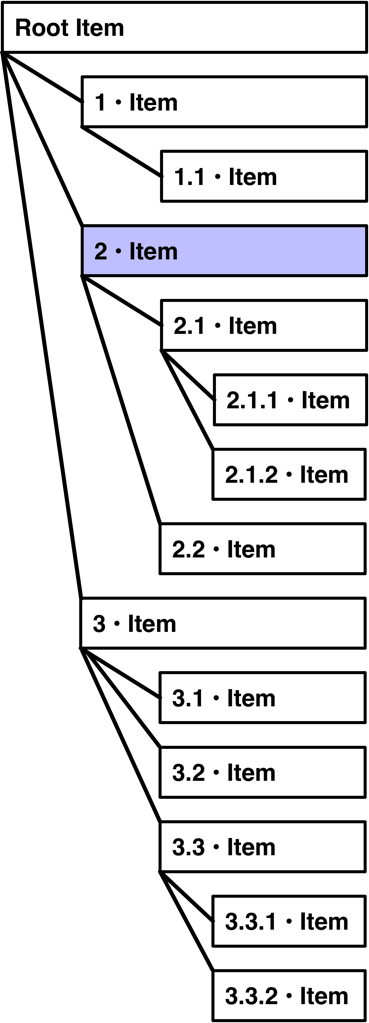
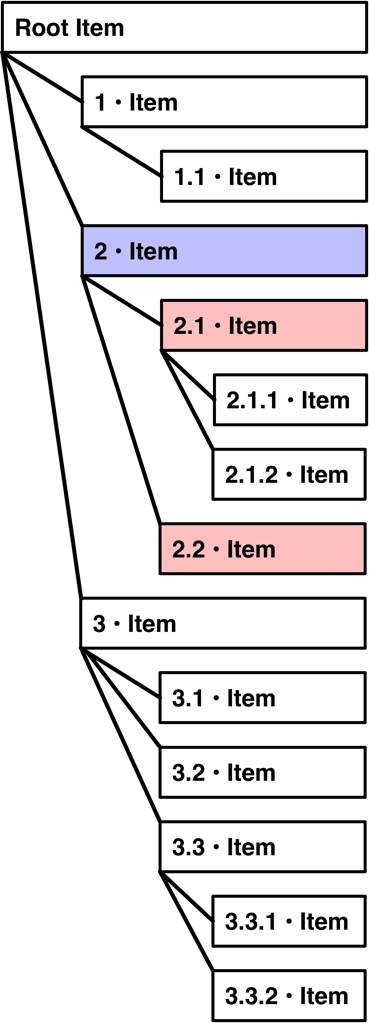
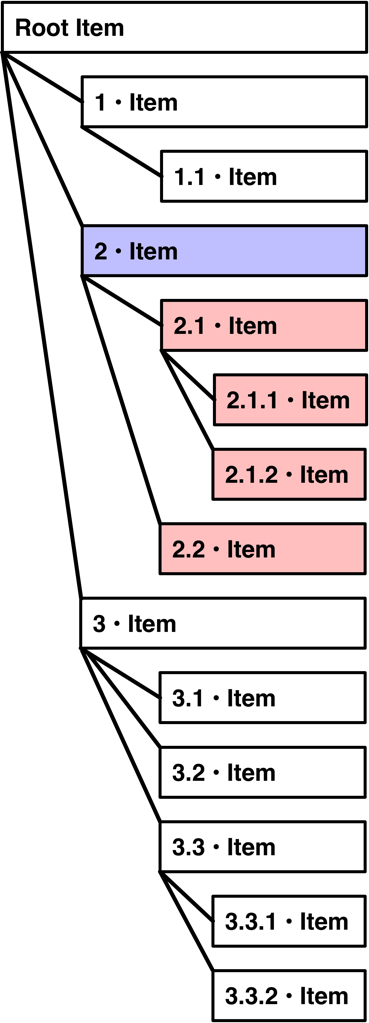
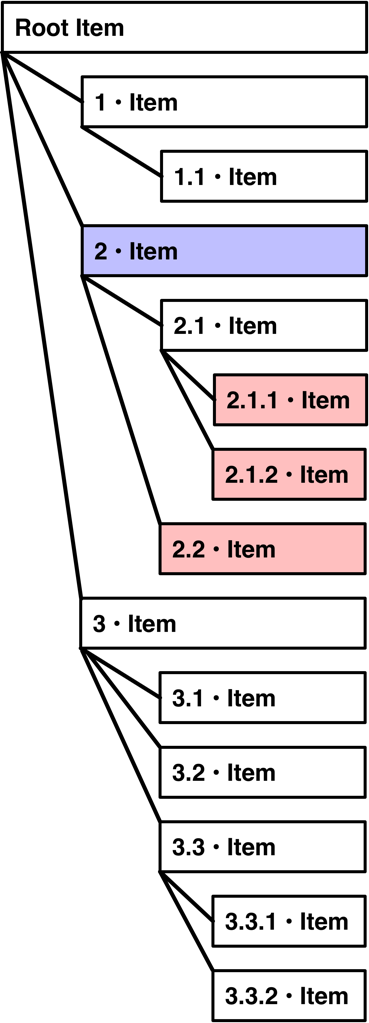
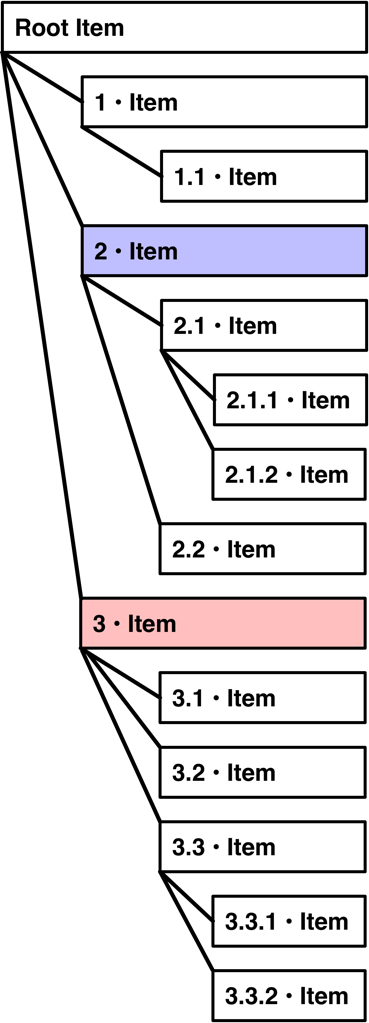
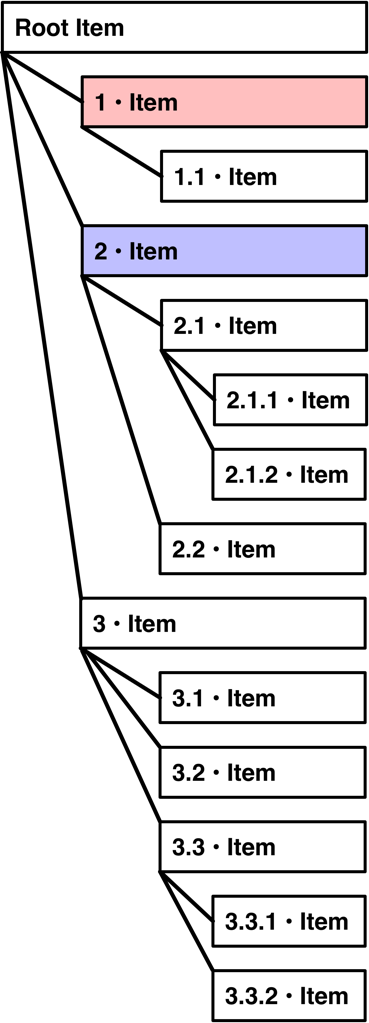
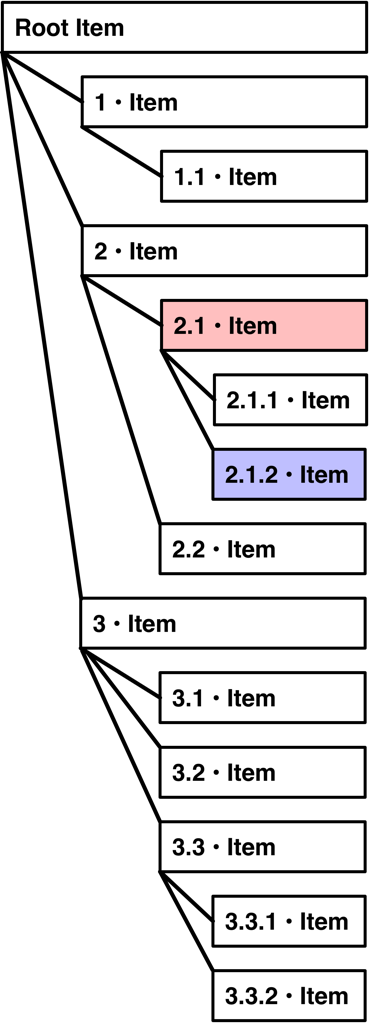
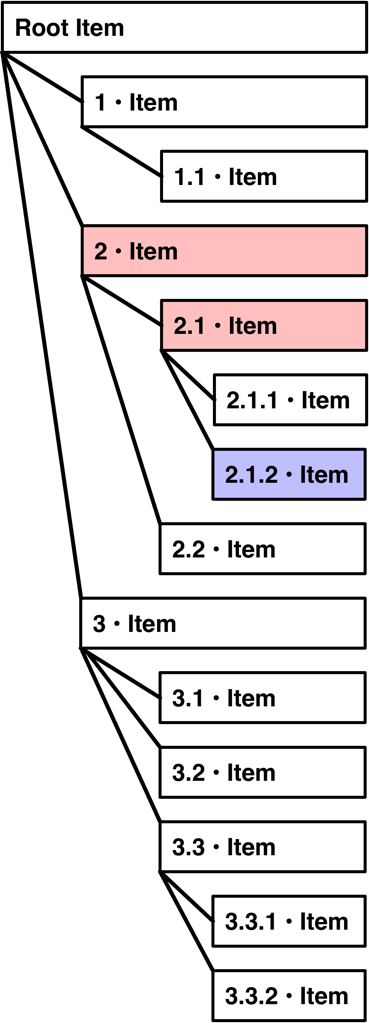
The illustrations below represent some of the relational properties of the Item class:
rootItem |
rootItem.children |
rootItem.descendants |
rootItem.leaves |
 |
 |
 |
 |
item |
item.children |
item.descendants |
item.leaves |
 |
 |
 |
 |
item.followingSiblings |
item.precedingSiblings |
item.parent |
item.ancestors |
 |
 |
 |
 |
Item Instance Properties
Here are the properties of an instance of the Item class:
childrenAreSections (Boolean) • Control whether the receiver’s chidlren are sections or not. Setting this to true will expand the item (and its ancestors) in the sidebar.
hasChildren (Boolean r/o) • Returns true if the Item has sub-items.
identifier (String r/o) • A per-document unique string that can be used to create a link for selecting the item in the outline.
index (Number r/o) • Returns the index of this Item among its siblings, or zero for the rootItem.
level (Number r/o) • Returns the nesting level of the Item, relative to the root of the item tree. The rootItem of an Outline has level zero, its children have level one, and so on.
note (String) • A convenience to access the value in the note column for the item
outline (Outline r/o) • The outline containing this item.
state (State or null) • The status of the row (which maps to the Outline’s statusColumn). Note that summaries are applied at the Tree level, so automatically calculated status values for items with children will not be reflected in this property. A null status indicates that the checkbox is disabled for this item, and if a summary is enabled for the column, this item does not contribute to the calculation.
style (Style r/o) • The style for this Item, which itself cascades from the Style for the entire Outline.
topic (String) • A convenience to set the value in the outline column for the item. The result will be a String, no matter what type the outline column is configured to use.
Since the value for identifier property is not able to be viewed in the document interface, here’s a script for displaying the ID of a selected outline item and placing a link to it on the clipboard. You can copy the ID from the dialog or from the console window.
Display Identifier of Selected Item
items = document.editors[0].selection.itemsif (items.length !== 1){errTitle = 'SELECTION ERROR'errMsg = 'Please select a single item.'alert = new Alert(errTitle, errMsg)alert.show(buttonIndex => {throw {name: errTitle,message: errMsg}})} else {itemID = items[0].identifierconsole.log(itemID)linkStr = `omnioutliner:///open?row=${itemID}`Pasteboard.general.string = linkStrnew Alert(items[0].topic, itemID).show()}
You can create a link URL using the item identifier to switch to OmniOutliner and show the specified row. NOTE: item identifier links only work for the frontmost document, which must contain the targeted row.
Show a Specific Row using Identifier
itemID = "bHkiZI2Qms1"linkStr = `omnioutliner://localhost/open?row=${itemID}`URL.fromString(linkStr).open()
State Properties
The State properties are the value for the state property of the Item class and reflect the status of the checkbox field of the item:
Checked • The checkbox value is checked.
Mixed • The checkbox value has a mixed state, due to child items having a combination of Checked and Unchecked states.
Unchecked • The checkbox value is not checked.
IMPORTANT: The value of the state property of the Item class does not return accurate values. Use the state property of the ItemTreeNode (node) class instead:
State of Selected Item
selectedNodes = document.editors[0].selectedNodesif(selectedNodes.length === 1){selectedNode = selectedNodes[0]if(selectedNode.state === State.Checked){var message = "Selected item state is checked."} else if (selectedNode.state === State.Mixed){var message = "Selected item state is mixed."} else if (selectedNode.state === State.Unchecked){var message = "Selected item state is unchecked."}new Alert('ITEM STATE', message).show()}
An alternative technique is to use the nodeForObject() function of the Editor class to derive the corresponding node for the selected item:
State of Selected Node (Item)
var editor = document.editors[0]selectedItems = editor.selection.itemsif(selectedItems.length === 1){selectedItem = selectedItems[0]selectedNode = editor.nodeForObject(selectedItem)if(selectedNode.state === State.Checked){var message = "Selected item state is checked."} else if (selectedNode.state === State.Mixed){var message = "Selected item state is mixed."} else if (selectedNode.state === State.Unchecked){var message = "Selected item state is unchecked."}new Alert('ITEM STATE', message).show()}
Here’s a script that focuses the checked items:
Focus Checked Items
editor = document.editors[0]tree = document.outlinecheckedItems = tree.rootItem.descendants.filter(item => {node = editor.nodeForObject(item)if(node.state !== State.Unchecked){return item}})if(checkedItems.length > 0){editor.focusedItems = checkedItems}
Functions of the Item Class
Here are the methods used with an instance of the Item class:
setValueForColumn(value:Object or nil, Column) • Assigns a new value or clears the value for the cell defined by the intersection of this Item and the specified Column.
valueForColumn(Column) • Returns the current value (or null) for the cell defined by the intersection of this Item and the specified Column.
addChild(ItemPosition or nil, Function or nil) • Adds a new Item as a child of this item, at the specified position. If no position is specified, the child is added after any existing children. An optional Function, taking an Item argument, may be passed to configure properties on the item before it is added to the parent). Returns the added Item.
remove()• Removes the Item from its parent. Attempting to remove the rootItem of an Outline will throw an error.
apply(Function) • Calls the supplied Function for each Item in the receiver (including the receiver), passing that item as the single argument. The function may optional return a Item.ApplyResult to stop or skip some of the items. Any other return value (including none) will continue the application of the function to the remaining items.
Here’s short script that uses the valueForColumn() method to copy the contents of a column into the notes field of each top-level row.
Copy Text of Column Cell to Item Note
var columnRef = columns.byTitle('Title of Column to Copy')rootItem.children.forEach(item => {item.note = item.valueForColumn(columnRef).string})
Here’s a script that uses the remove() function to delete all descendants of the selected item:
Delete Descendants of Selected Item
var editor = document.editors[0]selectedItems = editor.selection.itemsif(selectedItems.length === 1){selectedItem = selectedItems[0]selectedItem.descendants.forEach(item => {item.remove()})}
Getting Selected Items
Object references to the selected items can be acquired using the Selection instance of the current Editor object. IF no items are selected, the result will be an empty array.
Get Selected Items
selectedItems = document.editors[0].selection.items
References to selected outline items can also be acquired through the use of the selectedNodes property of the Editor class. The value of this property is an array of TreeNodes instances. The item represented by a TreeNode is accessed through the object property of the TreeNode instance.
Using the map() method is an efficient means for deriving an array of selected item objects from their corresponding Treenode (Node) instances:
Get Selected Node Objects (Items)
editor = document.editors[0]selectedItems = editor.selectedNodes.map(node => node.object)
A basic script for processing the selected items:
Process Selected Items
selectedItems = document.editors[0].selection.itemsif (selectedItems.length === 0){errTitle = 'SELECTION ERROR'errMesssage = 'No items are selected.'new Alert(errTitle, errMesssage).show()} else {// process items}
The following script creates and displays an Alert dialog showing the text (topic) of the single selected item:
Text of Single Selected Item
selectedItems = document.editors[0].selection.itemsif (selectedItems.length !== 1){errTitle = 'SELECTION ERROR'errMesssage = 'Please select a single item.'new Alert(errTitle, errMesssage).show()} else {// process itemselectedItem = selectedItems[0]new Alert('Item Text',selectedItem.topic).show()}
The topic property of the Item class (shown above) is provided as a way to make it easier for scripts to retrieve and set the value of the topic column (outlineColumn) of an item.
The following script shows how the value of a specified column is retrieved using the valueForColumn() method. Compare it to the version above.
Text of Single Selected Item (Alternate)
selectedItems = document.editors[0].selection.itemsif (selectedItems.length !== 1){var errTitle = 'SELECTION ERROR'var errMesssage = 'Please select a single item.'new Alert(errTitle, errMesssage).show()} else {// process itemselectedItem = selectedItems[0]targetColumn = document.outline.outlineColumnitemValue = selectedItem.valueForColumn(targetColumn).stringnew Alert('Item Text',itemValue).show()}
Getting Outline Contents (text)
The following example scripts demonstrate two techniques for extracting the text contents of the outline topics, inserting tab characters for outline indents:
Iterating Descendants
var topics = new Array()var indent = '\t'rootItem.descendants.forEach(item => {level = item.levelif (level > 1){var itemString = indent.repeat(level-1) + item.topic} else {var itemString = item.topic}topics.push(itemString)})Pasteboard.general.string = topics.join('\n')
Calling the apply() function on the rootItem:
Using the apply() Function
var topics = new Array()var indent = '\t'rootItem.apply(item => {level = item.levelif (level > 1){var itemString = indent.repeat(level-1) + item.topic} else {var itemString = item.topic}topics.push(itemString)})Pasteboard.general.string = topics.join('\n')
TIP: To retrieve the complete contents of the outline as text, including notes, create a file wrapper for the “plain text” file type and retrieve its data as text:
Full Outline as Text
(async () => {fileTypeID = "public.plain-text"baseName = "Text Export"wrapper = await document.makeFileWrapper(baseName, fileTypeID)Pasteboard.general.string = wrapper.contents.toString()})();
TIP: Using the Share Panel to export the outline as text to Mail, Messages, Notes, or 3rd-Party applications:
Export the Outline as Text
(async () => {fileTypeID = "public.plain-text"baseName = "Text Export"wrapper = await document.makeFileWrapper(baseName, fileTypeID)new SharePanel([wrapper.contents.toString()]).show()})();
Adding Items
Items (rows) are added to an outline using the addChild() method:
addChild(itemPosition or null, configuringFunction or null) (Item) • Adds a new Item instance as a child of this item, at the specified position. If no position is specified, the child is added after any existing children. An optional Function, taking an Item argument, may be passed to configure properties on the item before it is added to the parent). Returns the added item.
For example, here’s how to add an empty top-level item (row) to the end of the outline by calling the addChild() method on the rootItem. The resulting object reference to the newly created item is returned and copied into the variable: newRow
New Row at End of Outline
newRow = rootItem.addChild()
A variation of the previous script that manually sets the value of the topic property after creation of the item:
New Row with Topic
newRow = rootItem.addChild()newRow.topic = "How Now Brown Cow"
An example using the parameters of the addChild() function to create a new row with topic:
Append New Top-Level Row
newRow = rootItem.addChild(null,item => {item.topic = "New Row"})
Adding a new row to the end of the outline and then selecting the newly added row by addressing the current instance of the Editor class:
Append and Select New Top-Level Row
newRow = rootItem.addChild(null,item => {item.topic = "New Row"})editor = document.editors[0]node = editor.nodeForObject(newRow)editor.select([node], false)
Inserting a new row at the beginning of the outline and then selecting the newly added row by addressing the current instance of the Editor class. Note the position indicator (in Red) included in the function:
Prepend and Select New Top-Level Row
newRow = rootItem.addChild(rootItem.beginning,item => {item.topic = "New Row"})editor = document.editors[0]node = editor.nodeForObject(newRow)editor.select([node], false)
BONUS: this variation uses the Item instance’s style property and Style.Attribute class to insert and select a new styled row at the beginning of the outline:
Insert and Select New Styled Row
newRow = rootItem.addChild(rootItem.beginning,item => {item.topic = "THIS IS IMPORTANT BECAUSE IT IS RED!"item.style.set(Style.Attribute.FontFillColor, Color.red)})editor = document.editors[0]node = editor.nodeForObject(newRow)editor.select([node], false)
Item Position Properties
The item position properties are used to identify the position of a child item within its parental hierarchy.
after (ItemPosition r/o) • Returns an ItemPosition that indicates the slot after this item.
before (ItemPosition r/o) • Returns an ItemPosition that indicates the slot before this item.
beginning (ItemPosition r/o) • Returns an ItemPosition that indicates the position before any existing children.
end (ItemPosition r/o) • Returns an ItemPosition that indicates the position before after existing children.
The following scripts are examples using the ItemPosition class position properties. In each example, a new item (child) is created using the addChild() instance method, which takes as its parameters, the item position at which the new item is added, and an optional function for manipulating the created item.
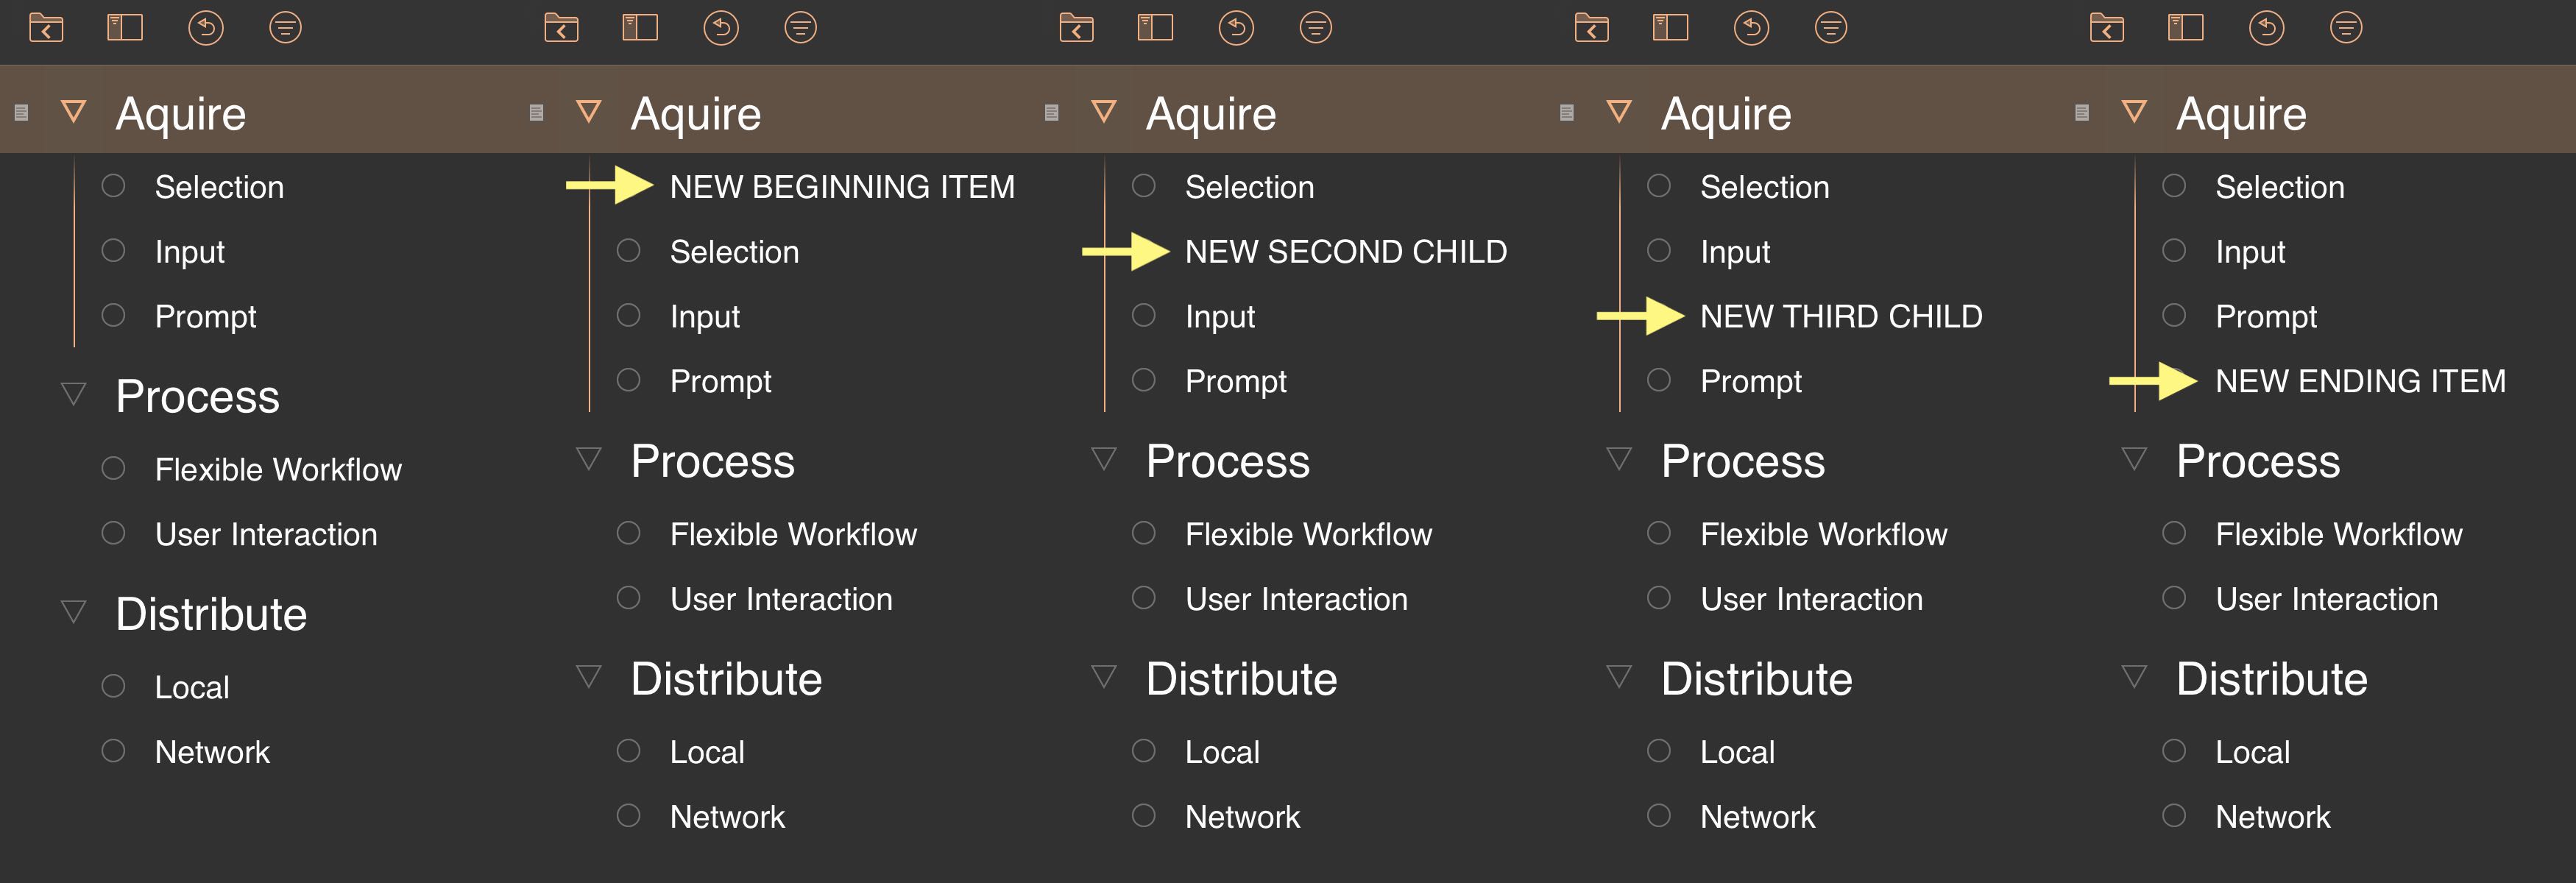
(⬇ see below ) The example insertion locations used to insert a new child row into a selected row:
If you wish to try the examples yourself, run the following script for creating the demonstration document:
Create New Demo Document
Document.makeNewAndShow(doc => {baseItem = doc.editors[0].rootNode.objectbaseItem.addChild(null, item => {item.topic = 'Aquire'item.addChild(null, itm => {itm.topic = "Selection"})item.addChild(null, itm => {itm.topic = "Input"})item.addChild(null, itm => {itm.topic = "Prompt"})})baseItem.addChild(null, item => {item.topic = 'Process'item.addChild(null, itm => {itm.topic = "Flexible Workflow"})item.addChild(null, itm => {itm.topic = "User Interaction"})})baseItem.addChild(null, item => {item.topic = 'Distribute'item.addChild(null, itm => {itm.topic = "Local"})item.addChild(null, itm => {itm.topic = "Network"})})doc.outline.baseStyle.clear()bColor = Color.RGB(0.193246, 0.193246, 0.193246, 1.0)doc.outline.baseStyle.set(Style.Attribute.BackgroundColor, bColor)doc.outline.baseStyle.set(Style.Attribute.FontFillColor, Color.white)doc.outline.baseStyle.set(Style.Attribute.FontFamily, 'Tahoma')doc.outline.baseStyle.set(Style.Attribute.ParagraphLineHeightMultiple, 1.1)doc.outline.levelStyle(0).set(Style.Attribute.FontSize, 26)doc.outline.levelStyle(0).set(Style.Attribute.ParagraphLineHeightMultiple, 1.2)doc.outline.levelStyle(1).set(Style.Attribute.FontSize, 18)editor = doc.editors[0]editor.rootNode.children.forEach(node => {node.expand()})})
EX 1) Using the after Property
The first positional example will demonstrate how to add a row (child) after the second row (child) of selected item.
Note the use of the children property to list the items contained in the selected item’s hierarchy. Since the first item in a JavaScript array (list) has an index of “0”, the use of the integer “1” indicates the second item in the array of child rows.
Also note the use of the after positional property to indicate where the new row should be created.
| DO THIS ► | Once the new document is created, select the first top-level item (row) titled “Aquire” and click the “Run Script” button. |
Insert Row After 2nd Child of Selected Row
var editor = document.editors[0]selectedItems = editor.selection.itemsif(selectedItems.length === 1){selectedItem = selectedItems[0]newRow = selectedItem.addChild(selectedItem.children[1].after,item => {item.topic = "NEW THIRD CHILD"item.style.set(Style.Attribute.FontFillColor, Color.yellow)item.style.set(Style.Attribute.FontWeight, 9)})editor.select([editor.nodeForObject(newRow)], false)}
A new row titled “NEW THIRD CHILD” will be inserted into the selected item’s hierarchy after the second child row.
| DO THIS ► | Before proceeding to the next example, use the “Undo” command from the “Edit” menu to revert the document back to its initial state. Leave the first row selected. |
EX 2) Using the before Property
This example will demonstrates how to add a row (child) before the second row (child) of selected item. Note the use of the before positional property.
Insert Row Before 2nd Child of Selected Row
var editor = document.editors[0]selectedItems = editor.selection.itemsif(selectedItems.length === 1){selectedItem = selectedItems[0]newRow = selectedItem.addChild(selectedItem.children[1].before,item => {item.topic = "NEW SECOND CHILD"item.style.set(Style.Attribute.FontFillColor, Color.yellow)item.style.set(Style.Attribute.FontWeight, 9)})editor.select([editor.nodeForObject(newRow)], false)}
EX 3) Using the beginning Property
This example will demonstrates how to insert a row (child) add child at the beginning of children of selected item. Note the use of the beginning positional property.
Insert Row at Beginning of Children of Selected Row
var editor = document.editors[0]selectedItems = editor.selection.itemsif(selectedItems.length === 1){selectedItem = selectedItems[0]newRow = selectedItem.addChild(selectedItem.beginning,item => {item.topic = "NEW BEGINNING ITEM"item.style.set(Style.Attribute.FontFillColor, Color.yellow)item.style.set(Style.Attribute.FontWeight, 9)})editor.select([editor.nodeForObject(newRow)], false)}
EX 4) Using the end Property
This example will demonstrates how to insert a row (child) add child at the end of children of selected item. Note the use of the end positional property.
Insert Row at End of Children of Selected Row
var editor = document.editors[0]selectedItems = editor.selection.itemsif(selectedItems.length === 1){selectedItem = selectedItems[0]newRow = selectedItem.addChild(selectedItem.end,item => {item.topic = "NEW ENDING ITEM"item.style.set(Style.Attribute.FontFillColor, Color.yellow)item.style.set(Style.Attribute.FontWeight, 9)})editor.select([editor.nodeForObject(newRow)], false)}
Working with Siblings
When creating an item position for a sibling of an item, use the parent property to reference the parent of the item and use the item’s position to indicate where the new item should be inserted.
| DO THIS ► | For the following sibling examples, select the second child, titled “Input”, of the first top-level row in the demo document, before running the examples. |
(⬇ see below ) The example insertion locations used to add siblings before and after a selected row:

EX 5) Preceding Sibling
This script will create a new item, before the selected item, at the same level of the selected item (sibling).
Adding a Preceding Sibling
var editor = document.editors[0]selectedItems = editor.selection.itemsif(selectedItems.length === 1){selectedItem = selectedItems[0]selectedItemParent = selectedItem.parentnewRow = selectedItemParent.addChild(selectedItem.before,item => {item.topic = "NEW PRECEDING SIBLING ITEM"item.style.set(Style.Attribute.FontFillColor, Color.yellow)item.style.set(Style.Attribute.FontWeight, 9)})editor.select([editor.nodeForObject(newRow)], false)}
EX 6) Following Sibling
This script will create a new item, after the selected item, at the same level of the selected item (sibling).
Adding a Following Sibling
var editor = document.editors[0]selectedItems = editor.selection.itemsif(selectedItems.length === 1){selectedItem = selectedItems[0]selectedItemParent = selectedItem.parentnewRow = selectedItemParent.addChild(selectedItem.after,item => {item.topic = "NEW FOLLOWING SIBLING ITEM"item.style.set(Style.Attribute.FontFillColor, Color.yellow)item.style.set(Style.Attribute.FontWeight, 9)})editor.select([editor.nodeForObject(newRow)], false)}